


Introduction
Australian boards are no longer spectators in cyber. Between regulators, litigators and the media, directors are now expected to understand cyber risk, oversee it as a core part of the risk framework, and be able to show that they have done so with care and diligence.
In recent years we’ve seen that expectation harden into law and practice. APRA’s CPS 234[1] makes boards “ultimately responsible” for information security in regulated entities. The Security of Critical Infrastructure Act (SOCI)[2] requires boards of critical infrastructure entities to approve annual reports on their critical infrastructure risk management programs. The Privacy Act’s Notifiable Data Breaches[3] scheme and high-profile actions such as those following the Medibank breach have pushed “reasonable steps” to secure personal information into the mainstream governance conversation. ASIC’s successful action in ASIC v RI Advice[4] confirmed that failing to maintain adequate cyber risk management can breach core licence obligations. And the ASX Corporate Governance Principles[5] now explicitly call out cyber security and privacy as contemporary risks boards must ensure are addressed in their risk frameworks.
The question we hear most from directors and CISOs alike is simple: how do we turn all of our reporting obligations and security programs into something we can govern coherently?
That is exactly where the Ionize GRC Maturity Model can help.
The Evolving Cyber Obligation for Australian Boards
Under the Corporations Act, directors must exercise care and diligence, act in good faith in the best interests of the company, and ensure the company has adequate systems to manage its risks. Regulators and the courts have now made it clear that cyber is part of that core risk set, not a side issue.
APRA’s CPS 234 is blunt: the board of an APRA-regulated entity is ultimately responsible for information security and must ensure that the entity’s information security capability and controls are commensurate with threats to its information assets. Its companion guide CPG 234[6] goes further, setting out the sort of information boards should receive including – roles and responsibilities, capability sufficiency, strategy execution, and assurance over controls so they can oversee and challenge management effectively.
ASIC has used the outcome of ASIC v RI Advice to send a message that inadequate cyber risk management can breach Australian Financial Services License (AFSL) obligations to act efficiently and fairly and to maintain adequate risk management systems. The Federal Court accepted that cyber risk is a “significant risk” tied to the conduct of financial services, and that while risk cannot be reduced to zero, it can be materially reduced through adequate documentation and controls. ASIC has been explicit that it expects boards to treat cyber as part of mainstream governance and is willing to take enforcement action where failures are egregious.
For listed entities, the ASX Corporate Governance Principles require boards to establish a sound risk management framework and periodically review its effectiveness (Principle 7). The associated guidance now makes it explicit that this includes contemporary and emerging risks such as cyber security, privacy and data breaches.
Owners and operators of critical infrastructure face additional “positive security obligations” under the SOCI Act, including mandatory incident reporting and the requirement to adopt and maintain a Critical Infrastructure Risk Management Program (CIRMP). The legislation requires an annual report on the CIRMP to be submitted within 90 days prior to year end, and if the entity has a board or governing body, that report must be approved by the board. Guidance from the Cyber and Infrastructure Security Centre[7] (CISC) emphasises that this is not a box ticking exercise but genuine board level assurance over how material cyber, physical, personnel and supply chain hazards are being managed.
On the privacy side, entities subject to the Privacy Act are required to take reasonable steps to secure personal information and, under the Notifiable Data Breaches scheme, to notify affected individuals and the OAIC when a breach is likely to cause serious harm. OAIC guidance on data breaches stresses the need for tested response plans, clear roles, rapid assessment and post-incident remediation all squarely in the territory boards are expected to oversee.
Overlaying this, the Australian Institute of Company Directors[8] (AICD), together with the Cyber Security CRC[9], has published Cyber Security Governance Principles[10] and detailed guidance on “Governing Through a Cyber Crisis”[11]. These documents frame cyber as a core board responsibility and organise board thinking around readiness, response, recovery and remediation.
In short: Australian boards are expected to own cyber as a governance issue, not just a technology one, and to be able to demonstrate that ownership.
The Ionize GRC Maturity Model in brief
The Ionize GRC Maturity Model is designed to give that increasingly complex obligation a simple, layered structure.
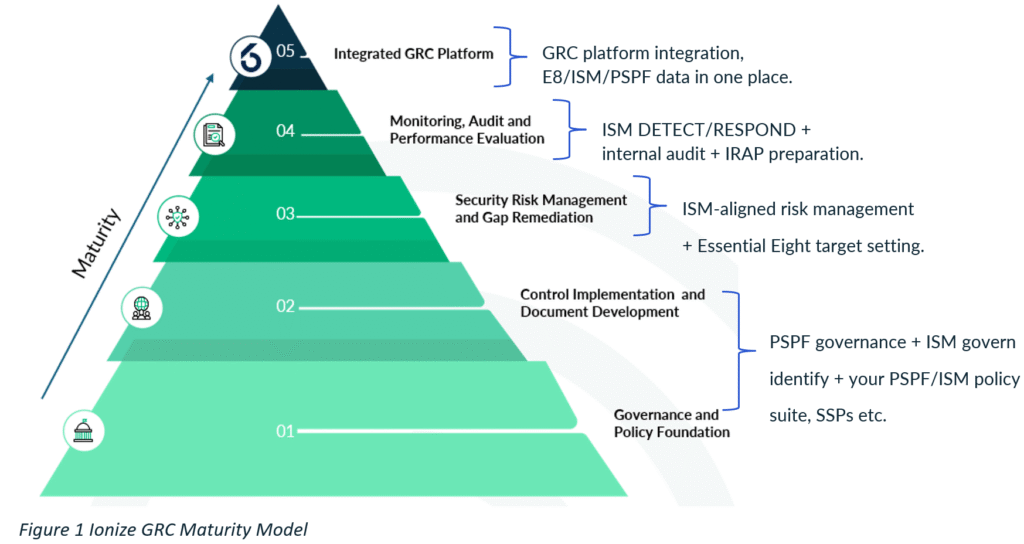
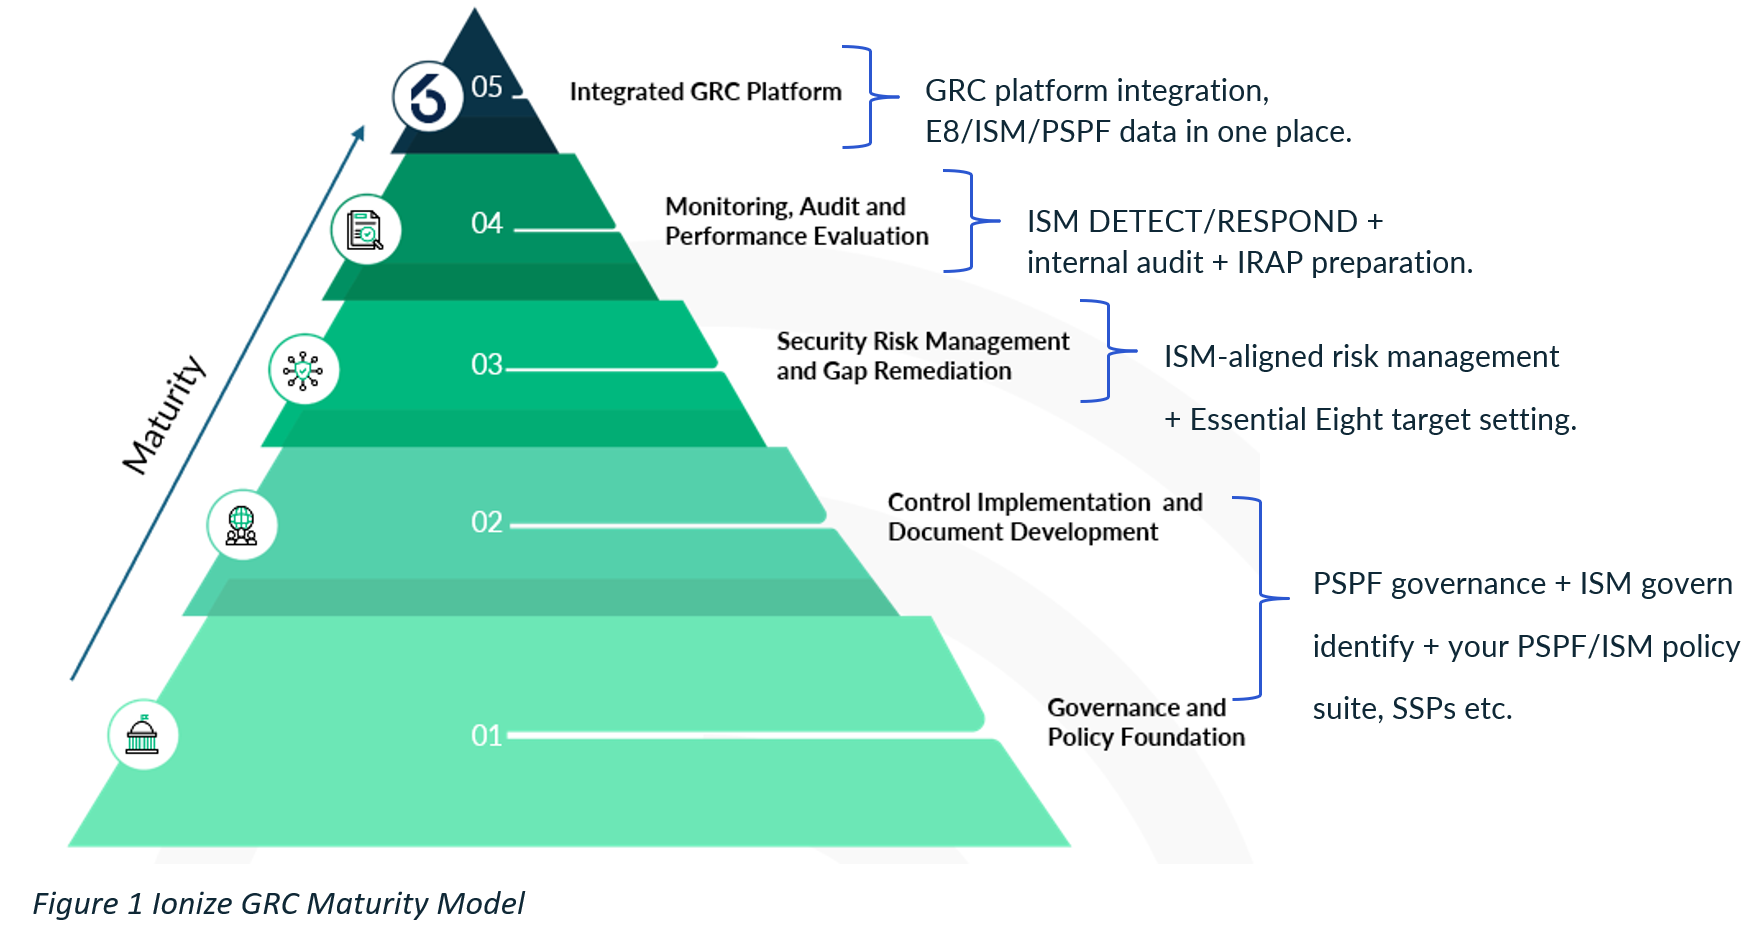
It describes the maturity of an organisation’s security and GRC capability across five layers:
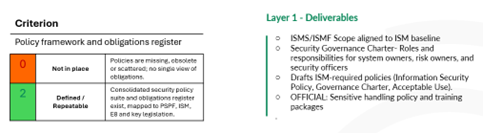
- Governance and policy foundation – scope, roles, committees, policy suite, obligations register.
- Control implementation and documentation – System Security Plans, incident and recovery plans, Essential Eight and other baseline controls, operating procedures.
- Risk management and gap remediation – cyber risk methodology, integration with enterprise risk, treatment of ISM/Essential Eight gaps, tracking of findings.
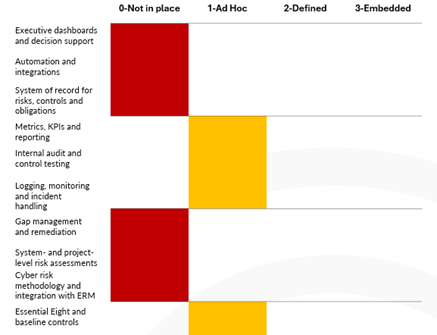
- Monitoring, audit and performance evaluation – logging and detection, incident handling, internal audit, control testing, metrics and governance reporting.
- Integrated GRC platform and continuous control monitoring – a system of record for risks, controls, obligations and incidents, with data feeds and dashboarding that enable continuous oversight.
Unlike many abstract models, each layer is defined in terms of concrete artefacts, roles and behaviours. That is what makes it useful to a board i.e. it bridges the gap between regulatory language and the day-to-day machinery of cyber governance.
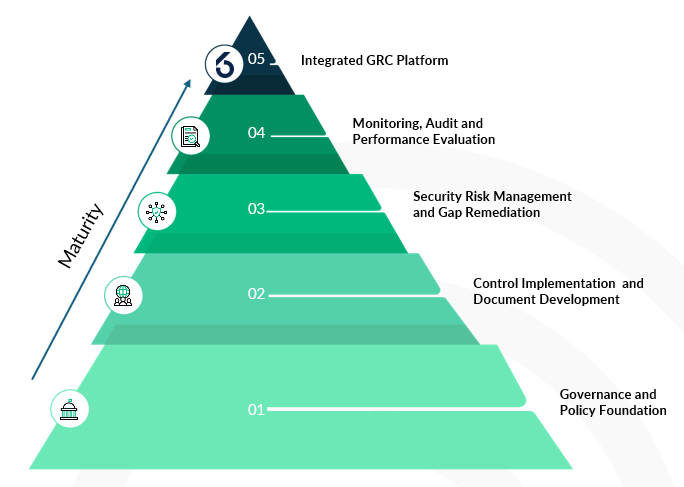
Figure 1 Ionize GRC Maturity Model
Turning fragmented obligations into a single, board-level narrative
One practical value of the Ionize model is that it lets you translate a messy list of statutory and regulatory obligations into a single picture the board can understand and interrogate.
Obligations around roles, accountability, policy and tone from the top e.g. directors’ duties under the Corporations Act, CPS 234’s requirement to define information-security roles and responsibilities, SOCI’s expectation of effective governance over critical assets, and AICD’s cyber principles, these all sit naturally in Layer 1. This is where the board can see whether it has set clear expectations for cyber, approved an appropriate policy and governance framework, and ensured there is a consolidated, current view of obligations.
Requirements to implement appropriate controls, maintain incident response and recovery capability, and notifiable data breach response plans fall into Layer 2. CPS 234’s focus on implementing controls commensurate with threat and systematically testing them is a classic Layer 2 concern, as are the expectations in OAIC guidance that organisations prepare and rehearse data breach response plans.
The heart of the directors’ obligation to manage foreseeable risk, including under SOCI’s risk management program requirements all reside within Layer 3. The CIRMP obligation to identify material hazards, minimise or eliminate them where reasonably practicable and mitigate their impacts is a risk-management statement. The requirement for an annual, board approved report on the program simply formalises the oversight expected at this layer.
Layer 4 is where CPS 234’s emphasis on ongoing testing and assurance, and ASIC’s expectations flowing from RI Advice, come into focus. Boards need evidence that the risk management framework and controls are working via logging and monitoring, incident statistics, internal audits, control tests and trend reports. This layer is also where ASX Principle 7’s call to ensure the risk framework deals adequately with cyber and data risks becomes concrete. The evidence is either there in the assurance program and metrics, or it is not.
Finally, Layer 5 deals with sustainability and repeatability. With a credible, integrated GRC platform and continuous control monitoring, boards can receive consistent, reporting including a single view of risks, incidents, findings and obligations, automated feeds from vulnerability management, identity systems and logging, and dashboards that support both regulatory reporting and public disclosure when necessary. This is increasingly important for regulated entities that must provide regular reports to APRA, CISC, OAIC and ASX investors from a coherent data set rather than manual collation.
By mapping each obligation into one or more of these layers, the CISO and risk team can give the board a structured, comprehensible spine for all the moving parts.
Giving boards a maturity-based view they can stand behind
Boards ultimately need to answer three questions: where are we now, is that adequate given our risk profile and obligations, and what is our plan to close the gap?
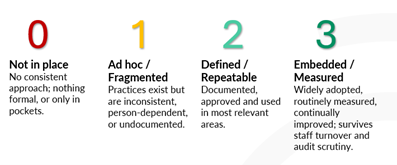
The Ionize model has been purposefully designed to describe a simple maturity scale for each layer. For example, from “not in place” through “ad hoc” and “defined” to “embedded and measured”. Against that scale, the CISO can work with management to build an evidence-based view of current maturity.
The board might be told, in plain language, that governance and policy (Layer 1) are at a defined stage i.e. policies exist; roles are written down; obligations are catalogued however risk integration and assurance (Layers 3 and 4) are still largely ad hoc, with inconsistent risk assessments, patchy audit coverage and limited cyber metrics. That picture can be anchored directly to the external expectations already described. An example would be highlighting that a Layer-1/2 strength, but a Layer-3/4 weakness is misaligned with CPS 234, SOCI, or ASX governance guidance for an organisation of that particular size and sector.
Because the model is layered, boards also see dependencies. If the foundations of governance and control documentation are weak, it is far easier for a director to understand why management is arguing against a premature investment in complex tooling and can recognise that such an investment might not satisfy regulatory expectations if the basics are not in place. Conversely, if governance and controls are strong but assurance and monitoring are not, directors can see that the immediate priority is independent testing, metrics and reporting, not more policy.
When minutes of board and committee meetings reflect this structured discussion and when the board can show it receives regular reporting against the layers it becomes far easier to demonstrate that directors have exercised the care and diligence regulators expect in relation to their cybersecurity obligations.
Helping cyber teams turn obligations into a roadmap the board can fund
From the perspective of the CISO and their team, the Ionize model is equally valuable. It provides a disciplined way to turn regulatory language into a portfolio of work the board can understand, prioritise and fund.
A sensible approach is to begin with a structured assessment, using the layers as lenses and the organisation’s obligations as reference points. Evidence from audits, incidents, IRAP assessments, Essential Eight reviews, SOCI preparations and privacy investigations is sorted into the relevant layer. Workshops with technology, risk, operations and business leads fill in the gaps.
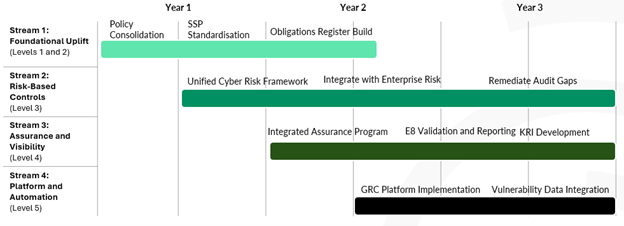
The result is a concise diagnostic identifying which layers are strong, which are fragile, and where the organisation is attempting to operate at a higher layer than its foundations support. That diagnostic is then converted into a multi-year roadmap that deliberately builds upward:
- strengthening governance, policy and obligations management
- standardising and documenting controls and response playbooks
- integrating cyber risk into enterprise risk and CIRMP-style frameworks
- building an assurance program and metrics that align with CPS 234, ASX and AICD guidance
- and finally, implementing or extending GRC platforms and continuous control monitoring to make all this sustainable.
Because initiatives are explicitly tied to layers and obligations, board papers can explain not just what needs to be done, but why it matters in regulatory terms. For example, a request to uplift monitoring, testing and reporting (Layer 4) can be directly connected to CPS 234’s requirement for systematic testing and APRA’s guidance on the information boards should receive, as well as the lessons from RI Advice about adequate risk management systems.
That kind of traceability makes budget discussions more grounded and easier to either approve or discount.
Structuring board reporting and cyber crisis governance
The Ionize model also gives a straightforward structure for board and committee reporting.
Rather than receiving a scatter of technical metrics and incident anecdotes, boards see regular reports organised by layer. This could include a short commentary and a small set of indicators for governance, controls, risk, assurance and platform. This aligns well with both CPS 234’s guidance on board information needs and the AICD’s cyber governance principles, which emphasise the importance of clear, decision relevant reporting and the ability to challenge management.
In a cyber crisis, the same structure can underpin governance. AICD’s “Governing Through a Cyber Crisis” highlights the board’s role across readiness, response, recovery and remediation. The Ionize layers map neatly over that arc:
- readiness grounded in governance and controls (Layers 1 and 2)
- response and recovery driven by risk understanding and monitoring (Layers 3 and 4)
- remediation tracked and sustained via integrated platforms and continuous monitoring (Layer 5).
Directors can use that structure to frame their questions in the heat of an incident and to oversee the quality of post-incident reviews and longer-term remediation.
Conclusion: a backbone for board-level cyber governance
The reality for Australian company boards is that cyber obligations are only going in one direction. Regulators now expect directors to be able to show that they have taken cyber seriously as an enterprise risk, that they have ensured appropriate capabilities, controls and assurance are in place, and that they have overseen incident response and recovery in a way that is consistent with their duties.
The Ionize GRC Maturity Model does not remove those obligations. What it does is provide a clear framework that connects them to the real work of security and risk teams. It turns a patchwork of CPS 234 clauses, SOCI rules, Privacy Act expectations, ASX principles, ASIC enforcement signals and AICD guidance into a single, layered view of how cyber is governed, controlled, tested and reported in your organisation.
For boards, that means a way to engage with cyber that is structured, comprehensible and evidence based. For CISOs and their teams, it means a way to express their reality in governance language and to build uplift roadmaps the board can own and fund.
In a landscape where “we thought IT had it covered” is no longer an acceptable answer, having that framework matters.
[1] cps_234_july_2019_for_public_release.pdf
[2] Security of Critical Infrastructure Act 2018 (SOCI)
[3] PRIVACY AMENDMENT (NOTIFIABLE DATA BREACHES) ACT 2017 (NO. 12, 2017) – SCHEDULE 1
[4] Australian Securities and Investments Commission v RI Advice Group Pty
[5] Corporate governance principles and recommendations
[6] cpg_234_information_security_june_2019_1.pdf
[7] Critical Infrastructure Security Centre
[8] Australian Institute of Company Directors (AICD)
[9] Cyber Security Cooperative Research Centre | Cyber Security Cooperative Research Centre
[10] cyber-security-governance-principles-web3
[11] Governing Through a Cyber Crisis – Cyber Incident Response and Recovery for Australian Directors