


In 2015 a group of vulnerabilities labelled as Stagefright gained notoriety for their ability to hack your device via MMS message and then to remove all evidence of the message. Since then there has been an alarming number of critical vulnerabilities discovered and reported which affect the internal MediaServer and its subcomponents. In 2016 alone, out of the 73 code execution vulnerabilities discovered in Android, 49 of these affected the MediaServer. While the prevalence of these vulnerabilities is concerning, they are multiplied by the following issues:
-
the MediaServer service runs with very high privileges (set in the /init.rc file – see page 17 of jduck’s blackhat presentation) which includes full access to camera, audio and networking;
-
Google has taken a much more focused effort of finding and fixing this issues in the Android Open Source Project (AOSP) as can be see by looking through Android Security Bulletins. However, there can be a large delay between when fixes are committed to the source and when phone vendors release patches;
-
Google has taken the step of redesigning the whole MediaServer framework in Android Nougat (version 7.0) for better security and to add a higher level of permission granularity. However, as at May 2, 2017, 93% of all Android devices in use are still using version 6 or earlier; and
-
Android has recently eclipsed Windows as the most used operating system.
The combination of these issues means that until Android 7 takes a larger market share, there are serious concerns over the security of Android devices and the impact they have in organisations supporting BYOD policies.
The Media Framework and Source Code The MediaServer is responsible for the viewing and recording of any multimedia (audio and video). Prior to Android 7 each of the underlying components (AudioFlinger, AudioPolicyService, MediaPlayer, ResourceManagerService, CameraService, SoundTriggerHwService, RadioService) were all instantiated as threads within the MediaServer process.
Figure 1 shows the changes in the Media Framework in Android 7 compared to prior versions:

The source code for MediaServer for any version of Android can be accessed in the AOSP repository. To review the source code or build the source to run the emulator or to deploy to a device you need to allow 100-150GB of space. Follow the steps from https://source.android.com/source/requirements.html. For my build I used an Ubuntu 16.04 LTS (64bit) host system and since we want to work with a vulnerable version of Lollipop we require OpenJDK7.
When initalising the repo client I used:
repo init -u https://android.googlesource.com/platfrom/manifest -b android-5.0.1_r1
and sync the repository:
repo sync
If you are working with different versions of Android be sure to stash any changes with git and ensure that the repo sync completes without errors. Building the AOSP Toolchain and running the Emulator Following the instructions from https://source.android.com/source/building.html you can decide what target you want your Android build to run on. You can type the lunch command to see what options are available. When adding code for other devices not listed already you can use the add_lunch_combo command.
For this build we are just using the built in emulator which uses a qemu kernel and i386 architecture. Choosing the i386 architecture and using the GPU means that you will have an emulator that performs well within your desktop environment.
When you have reviewed the instructions from the Android site and prepared your build environment you can setup the build environment makefiles with:
launch aosp_x86-eng
And then to build the environment:
make -jN
where N is the number of CPU cores you have access to.
Once you have successfully built Android you can now run the emulator. I build an SD card and setup a script to run the emulator. You could also setup an Android Virtual Device (AVD) to run the emulator in.
You need to create a SD card image for some of the default apps to work properly: mksdcard -l sdcard 2048M out/target/product/generic_x86/sdcard.img
This is the script I use to run the emulator:
#!/usr/bin/env bash

. ~/WORKING_DIRECTORY/build/envsetup.sh
export LD_LIBRARY_PATH=~/WORKING_DIRECTORY/prebuilts/android-emulator/linux-x86_64/lib/:$LD_LIBRARY_PATH
export ANDROID_PRODUCT_OUT=~/WORKING_DIRECTORY/out/target/product/generic_x86

ANDROID_SDK_LINUX=~/WORKING_DIRECTORY
ANDROID_BUILD_OUT=~/WORKING_DIRECTORY/out
ANDROID_BUILD=${ANDROID_BUILD_OUT}/target/product/generic_x86

echo "Out: " ${ANDROID_BUILD}
${ANDROID_SDK_LINUX}/prebuilts/android-emulator/linux-x86_64/emulator64-x86 \
 -sysdir ${ANDROID_BUILD} \
 -system ${ANDROID_BUILD}/system.img \
 -ramdisk ${ANDROID_BUILD}/ramdisk.img \
 -data ${ANDROID_BUILD}/userdata.img \
 -kernel ${ANDROID_SDK_LINUX}/prebuilts/qemu-kernel/x86/kernel-qemu \
 -sdcard ${ANDROID_BUILD}/sdcard.img \
 -memory 2048 \
 -gpu on \
 -ports 5554,5555 \
 -partition-size 1024 \
 -skindir ${ANDROID_SDK_LINUX}/development/tools/emulator/skins \
 -skin WVGA800
And you should have the emulator running like this…

Use the command:
adb devices
to see if the emulator is successfully connected to the Android debugging interface. I usually build open source file manager and terminal apps with Android studio to run on the device and use this command to install the apps:
adb install ../path/to/apk/filez
Working with the AOSP Toolchain Now we are ready to work with the AOSP Toolchain to test vulnerable code to develop proof of concept exploits.
To begin to understand how to do this a good example is Hanan Be’er’s Metaphor – A (real) real-life Stagefright exploit. This paper explores an exploit written for the CVE-2015-3864 exposure. The exploit crafts a MPEG4 file targeting an overflow bug in the timed text subtitle functionality of the Codec. We will demonstrate how to use GDB to run MediaServer to reach and access the vulnerable code sections although this exploit won’t successfully execute as it is specifically written for specific Android devices running the arm processor.
First determine the process id that the MediaServer is running as

Next we need to attach a gdbserver to the process. The AOSP Toolchain automatically includes a gdbserver in the Android build and the main way Android debugging is done is through attaching the gdb client to the gdbserver running on the device

Now the android device has gdbserver listening on port 33333 and is now attached to the MediaServer and the MediaServer is paused.
We can forward communications on this port through to our local desktop environment using
adb forward tcp:33333 tcp:33333
Before we start the gdb client we need to run a MPG4 file with subtitles – you will need to find a sample video online for this. You can then use the adb push command to load a file onto the device i.e. adb push your.mp4 /sdcard/. If you don’t run the MPG4 first and start the gdb client and attach it to the gdbsever will lock the device up.
The next step is to step up our local gdb environment to work with. The easiest thing to do is to setup a ~/.gdbinit file
file ~/WORKING_DIRECTORY/out-i386/target/product/generic_x86/symbols/system/bin/mediaserver
set solib-search-path ~/WORKING_DIRECTORY/out-i386/target/product/generic_x86/symbols/system/lib:~/WORKING_DIRECTORY/out-i386/target/product/generic_x86/symbols/system/lib/soundfx/:~/WORKING_DIRECTORY/out-i386/target/product/generic_x86/symbols/system/lib/hw/

set tcp auto-retry on

target remote :33333
This is executed everything you start gdb – setups the symbol tables for the MediaServer process and adds the shared libraries symbol tables for 72 libraries that the MediaServer process uses. Using tcp auto-retry helps to prevent packet drop/timeouts which can cause the gdb client to crash. The final command connects the gdb client to the gdb server.
Now you can use the local version the gdb client built within the AOSP (x86_64-linux-android-gdb) to control the execution of MediaServer and inspect the CPU registers
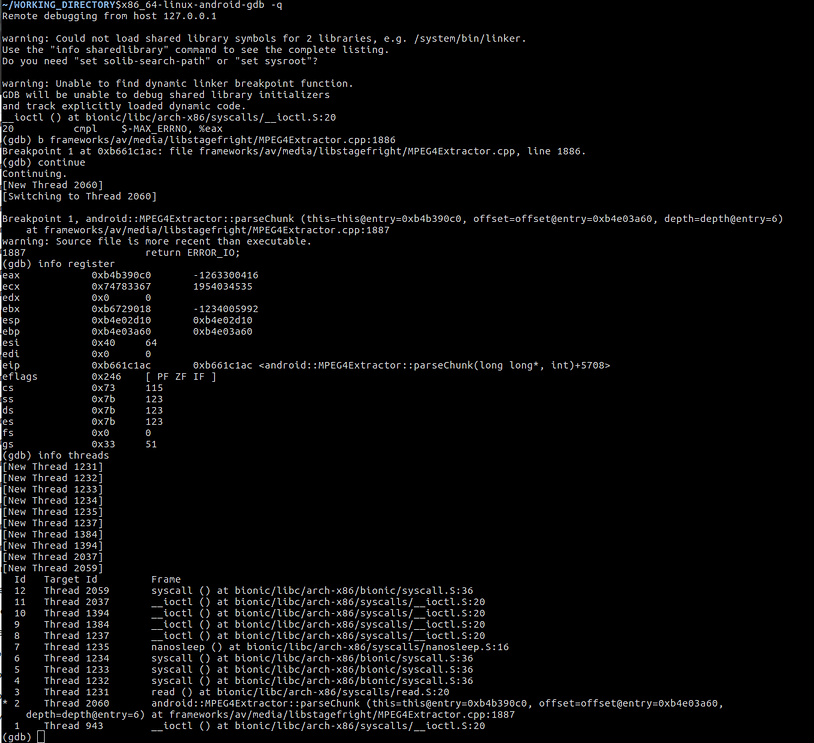
Here we have set a breakpoint to the vulnerable code in the MPEG4Extractor.cpp file in the paper we are using with the Stagefright exploit. We can then query the register values and see information about the threads running. You can also try using your host GDB client and load GDB enhancements like the Python Exploit Development Assistance for GDB

which gives you access to view the current state and the registers and is more useful when exploit developing or testing.
Testing Other Vulnerabilities If we look other critical CVEs for the Android MediaServer we can see Google internal bug reference numbers. We can use these nuggets to find where the vulnerable code is. Picking one at random we can look at CVE-2015-6609. This looks interesting as it suggests that a crafted audio file can exploit a privileged buffer overflow in the libutils library.
We can use the internal bug number (22953624) to find the vulnerable code in the source code (https://android.googlesource.com/platform/system/core/+/38c06b1%5E%21/).
The section of code that has the vulnerability:
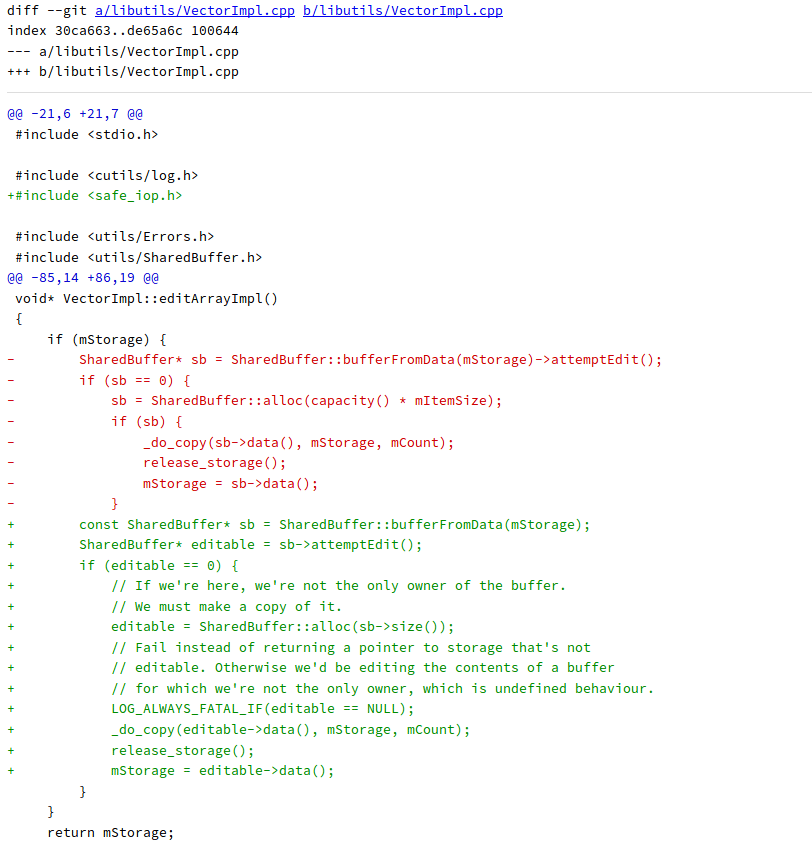
We now know how to set a breakpoint for this code spot and we can begin to see if this code is exploitable by crafting audio files.
Where To From Here In the next blog we will look at how to use the Android Open Source Project Toolchain to learn how to write PoC exploits beginning with playing with Android on a Raspberry Pi to look at the arm processor architecture. We will also explore how to write shellcode and reverse shells using the Android Native Development Kit (NDK) for specific Android versions and processor types.